-
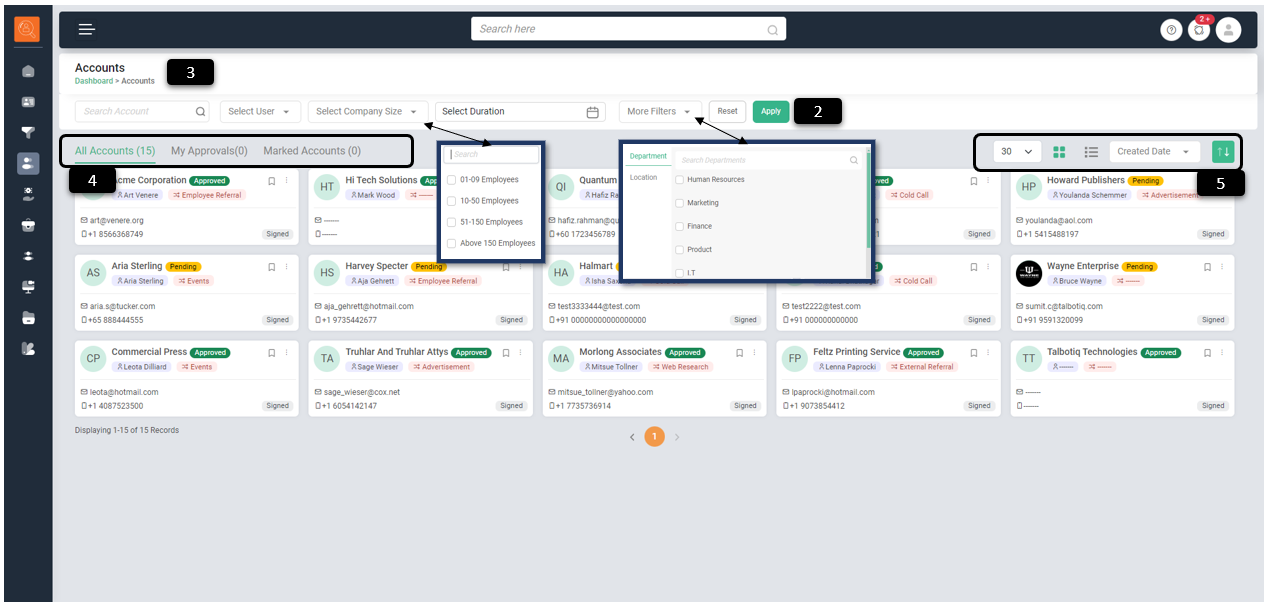
1 Create Account - Accounts are converted after contract sign-off, originating from a Lead. Creating an Account directly is not feasible due to process integrity. For further insights into this conversion process, please consult the Lead Conversion section below.
-
2 Filter/Search Bar - To filter page content as per various parameters e.g. Account Name, Company Size, Department, Location, Users, Date (Weekly, Monthly, Quarterly, Yearly and Custom Date). Click on "Reset" for default view and "Apply" to make filter applicable.
-
3 Navigation Icons - Use this to navigate to pages (it will take one to the page highlighted in green e.g. Dashboard).
-
4 Account Sub Tabs - These are quick view options to view Accounts as "Marked Accounts" and "My Approvals". My Approvals refer to Accounts which are to be approved by you, being an approval authority. Depending upon your role this tab may or may not be available.
-
5 View & Sort Options - For ease of viewing such as number of Accounts to be displayed per page, whether in list or card form. One can also sort Accounts basis "Name", "Created Date", "Last Modified" and "Location".
Account Card view and various functionalities:
-
1 "Create Activity" , directly from Account Card
-
2 "Create Opportunity" , directly from Account Card
-
3 "Create Brand Page" , directly from Account Card. Refer branding section for more details.
-
4 "Mark Account" , directly from Account Card for ease of view

Account Detail Overview and various functionalities
-
1 "Edit Details", if required after creating Account
-
2 Add "Tags" to search with ease e.g. "High Potential"
-
3 Edit "Contact Information" to change the contact details of Account as and when required.
-
4 "Overview" tab gives multitude of information pertaining to Account:
- "Contracts" shows if any earlier or current contract is available for the Account and also whether it is Active or Expired.
- "Invoices" reflects invoices raised or to be raised to said client and its status, invoice date, invoice number, amount, outstanding status etc. E.g. In current example "Status" is Draft, click on "Right Tick" under status to approve invoice raised. Under status you can also "Delete" or "Preview" the invoice.
- "Jobs" Keep you updated about Jobs and their status for the particular account.
- "Contacts" reflects details of individual associated with the Account.
-
5 "Recent Activities" bar let's you be updated with all recent activities e.g. Emails exchanged, Activities etc.
-
6 "Contract Tab" let's you "Create the Contract" for the Account or "Approve the Contract" or "Edit the Contract" as per your role.
-
7 "Contact Tab" let's you see the details of contact from client's side with ability to "Edit" or "Delete" the same.
-
8 "Invoices Tab" reflects invoices raised or to be raised to said client and its status, invoice date, invoice number, amount, outstanding status etc.
-
9 "Opportunities Tab" reflects any past or current opportunity associated with the Account.
-
10 "Jobs Tab" reflects any past or current Job associated with the Account.
-
11 Add "Notes" about contact such as any particular requirement they have, future prospects
-
12 "Create New Activity" use this feature to create task such as "Call" , "Meeting" etc. and directly assign from TALXrecruit this activity to your colleague or team member.
-
13 "Documents" use add documents related to concerned Account or view the ones already added in the system.
-
14 Interact via "Email" with contact directly from the TALXrecruit, no need to open multiple applications.


How to create an account? Convert Lead to Account
-
1 In the Lead tab, change status of Lead to "Signed" once the agreement is signed with client.
-
2 A window will open "Add Contract", here add relevant details such as Contract name, Duration, Contract Type, Payment Terms & Upload the signed copy of agreement.
-
3 Select "Approver" and click on Add button.
-
4 Go to "Accounts Tab" click on the respective account (it will have Pending Status" and open Account Details.)
-
5 Go to "Contracts Tab" and under the same Contract will reflect with "Pending" Status
-
6 Click on ellipsis (three dots) and click on Edit option.
-
7 Check the details added at "Lead" stage, click next and add "Contract Fees" details i.e. Rate Card.
-
8 Click next and add Tax Details, for invoicing perspective.
-
9 Click on ellipsis (three dots) and click on Approve option, applicable as per role level access. This will change status of an Lead to a final approved Account with signed agreement.
How to setup Rate Card?
-
1 Add "Name" and then "Product Type".
Product Type refers to whether it is a "permanent Placement Product" or a "Consultant Staffing Product", it can be configured as per the needs of an organisation. -
2 Select "Fee Type" i.e. based on which component of salary fee will be calculated.
-
3 Give Range for Salary Component e.g. Salary Gross Range from 10,00,000 INR to 15,00,000 INR. This will decide for which salary range what amount of fee needs to be charged.
-
4 Select "Type" i.e. either an amount or a percentage to be charged for Package offered within respective range.
-
5 Click on "Plus" icon to create multiple ranges of salary within same rate card.
-
6 You can create multiple rate card following step 1 to 5 for various products offered.