-
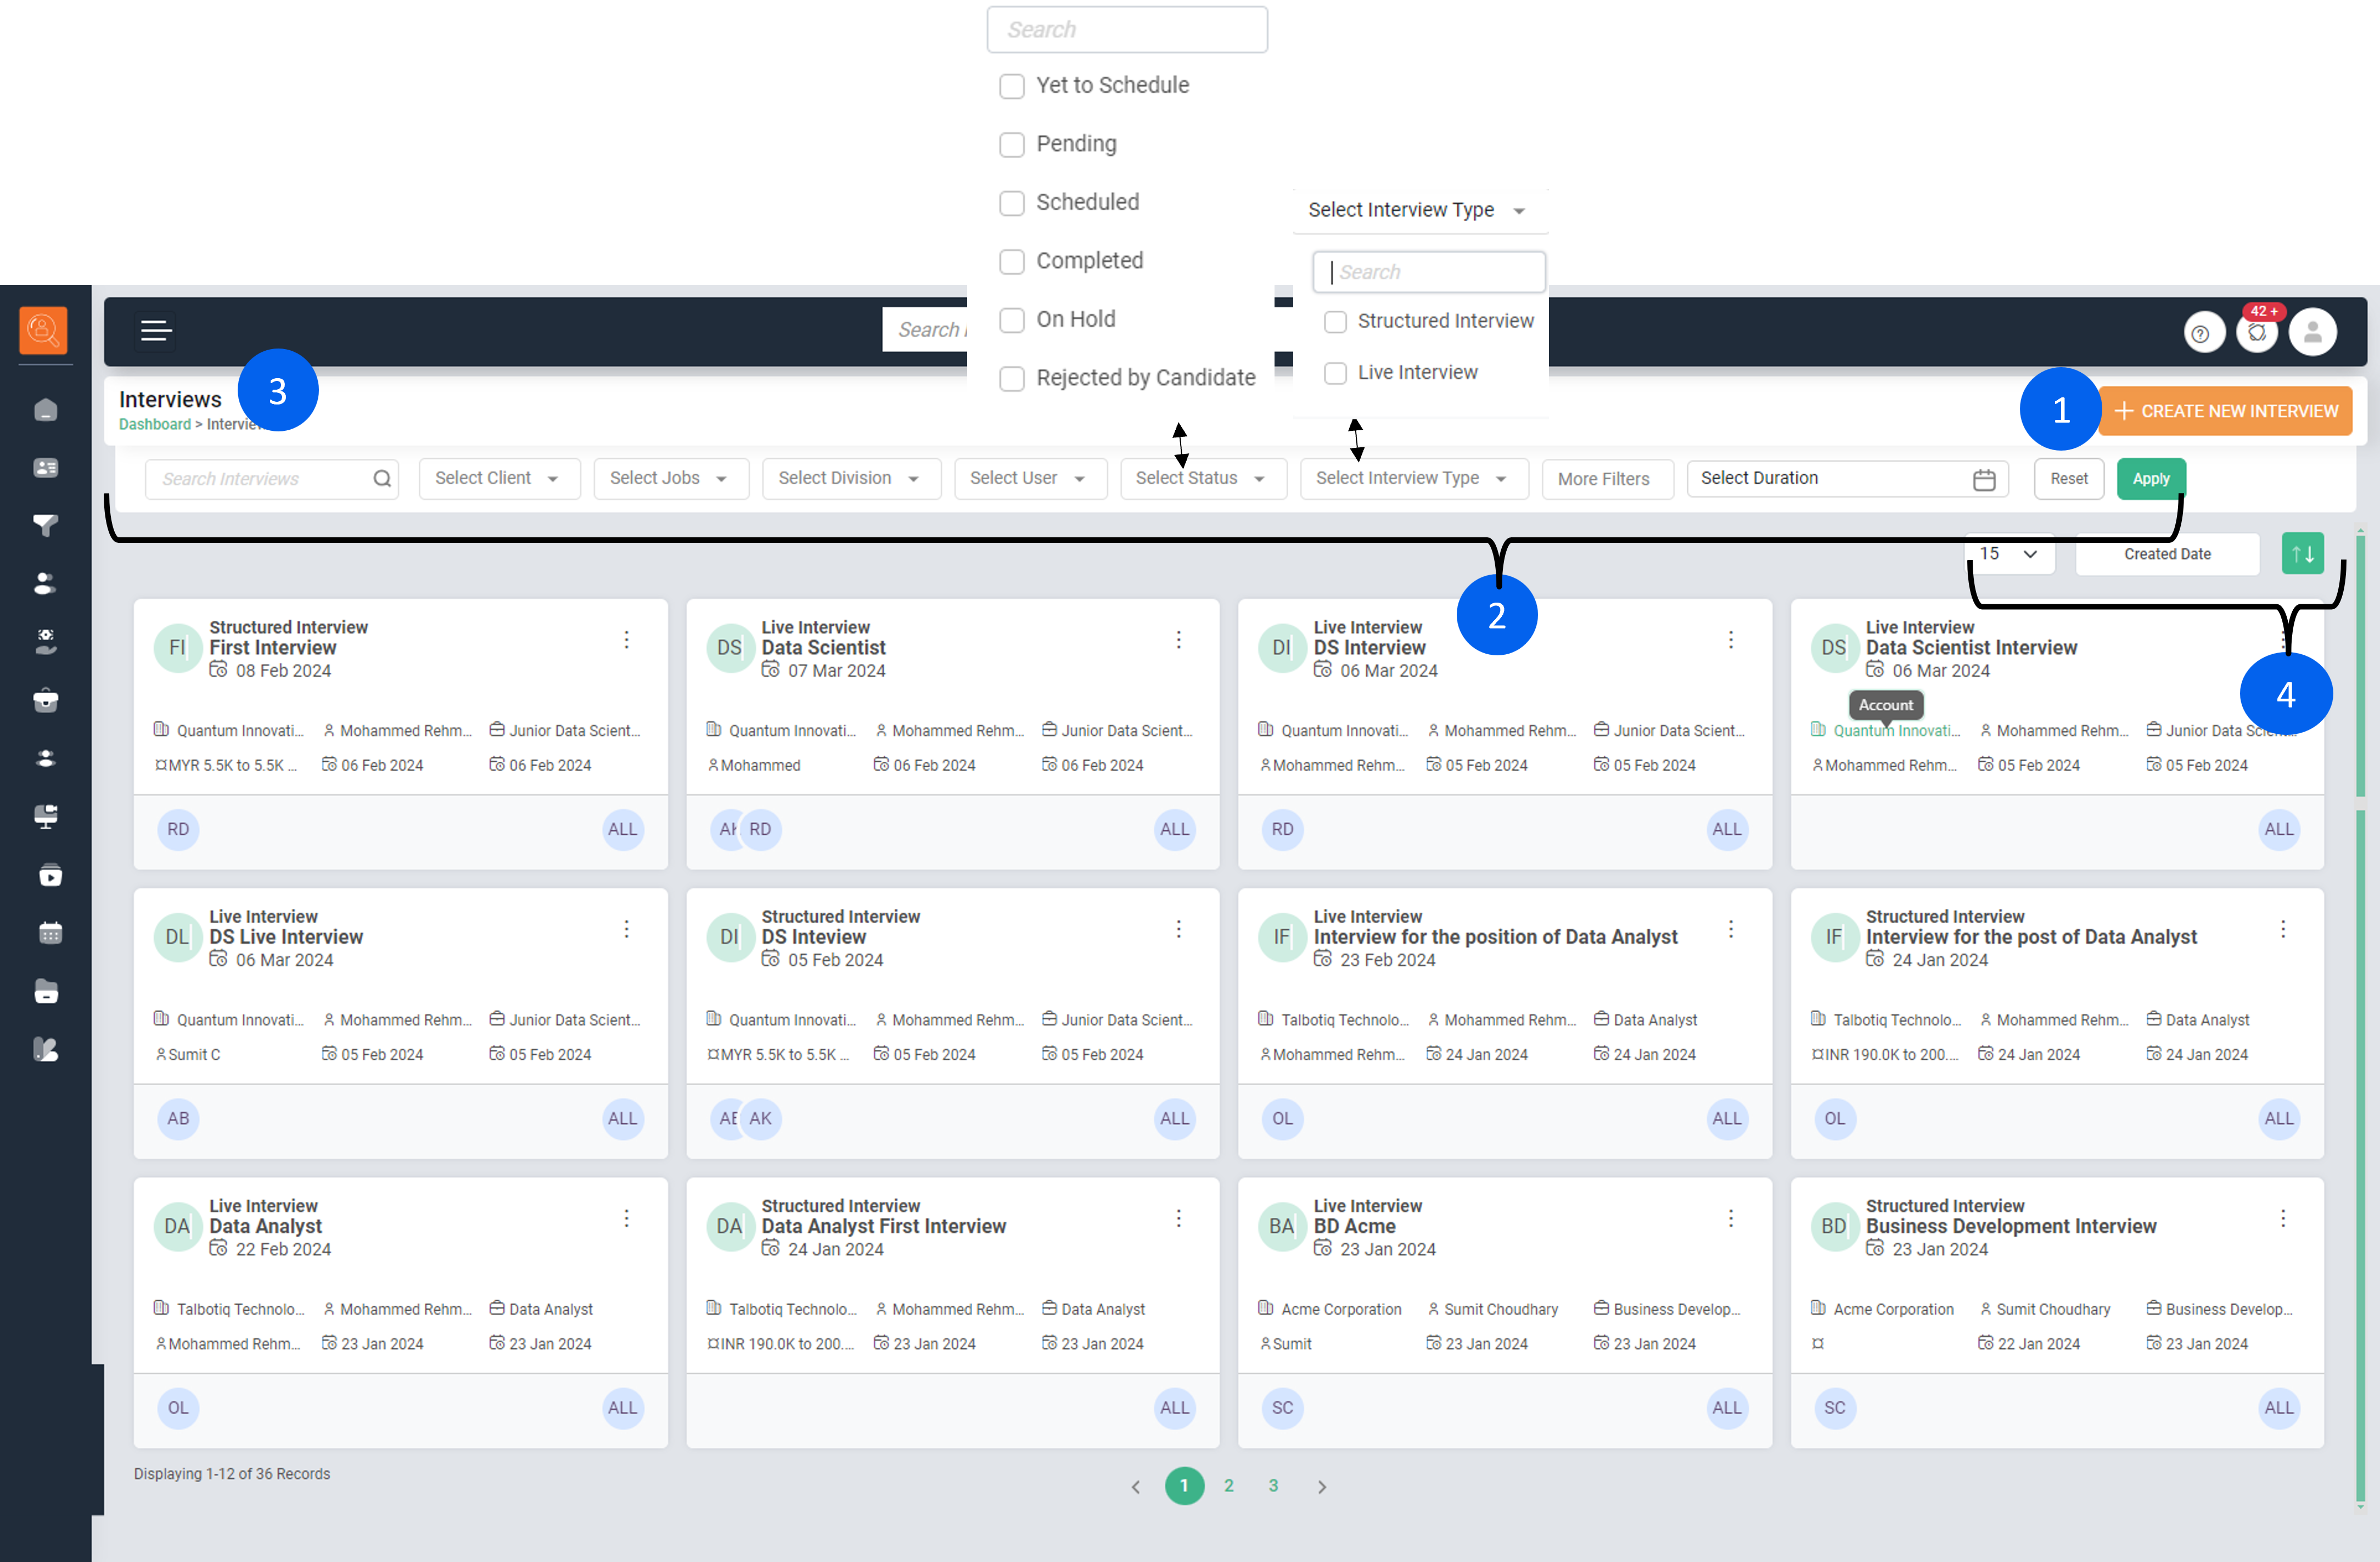
1 Create New interview - Utilize this feature to set up a new Interview, both structured and live.
-
2 Filter/Search Bar - To filter page content as per various parameters e.g. Job Name, Client Name, Division, Users, Status, Interview type, & Date (Today, Weekly, Monthly and Custom Date) and more filters such as Skills, Department, Package, Experience, Location. Click on "Reset" for default view and "Apply" to make filter applicable.
-
3 Navigation Icons - Used for page navigation. The icon highlighted in green indicates the path of current page.
-
4 View & Sort Options - For optimal viewing, you can adjust the number of Interviews displayed per page and choose to view them in either list or card format. Additionally, you can sort the Interviews based on ‘Name’, ‘Created Date’, and ‘Job’.
How to create an Inteview?
Option A - Via Job Page, by clicking on ellipsis (3dots) and selecting either "Structured Interview" or " Live Interview", this will start interview creation process for that job.
Option B - On the Interview Page, start the process by clicking the ‘Create New Interview’ button located in the top right-hand corner.
Structured Interview:
-
1 Click on "Create new Interview"
-
2 Select "Structured Interview" option, and click "Next"
-
3 Select the Job for which interview is to be created & Click "Next".
-
4 Adding Questions for the Candidate during a structured interview:
- Manually Input Each Question
- Utilize Questions from Previously Compiled ‘Question Sets’
- Employ the ‘Generate AI Question Set’ feature, which utilizes AI to formulate a set of questions based on the selected job.
-
5 Input the ‘Interview Title’ and choose the corresponding brand page of the Account that is linked with the Job.
-
6 Choose the ‘Due Date’ for the interview and select the ‘Recruiter’ who will be conducting the interview.
-
7 Incorporate Candidates into the interview from either the ‘Applied Candidates’ or ‘Recommended Candidates’ lists, or you can search from the ‘All Candidates’ within the system and click ‘Submit’. This action will establish the interview.
Live Interview:
-
1 Click on "Create new Interview"
-
2 Select "Live Interview" option, and click "Next"
-
3 Select the Job for which interview is to be created & Click "Next".
-
4 On the Settings Page, input the ‘Interview Title’ and choose the corresponding brand page of the Account that is related to the Job.
-
5 Add "Hiring Manager" & email id.
-
6 Choose the ‘Recruiter’, specify the ‘Interview Duration’, and indicate ‘Who will select the time slots’ for the interview. The options for this selection could be the Recruiter, Candidate, or Hiring Manager.
-
7 Include Candidates in the interview from either the ‘Applied Candidates’ or ‘Recommended Candidates’ lists, or you can perform a search from ‘All Candidates’ within the system. After making your selection, click ‘Submit’. This action will create the interview.
*Note: An email goes to concerned person, who selects multiple slots out of which interview can be scheduled as per availability of concerned mentioned in "Who Will pick the Slots" fieldAn email is sent to the relevant individual, who then selects from multiple available slots. The interview is scheduled based on the availability of the person specified in the ‘Who Will Pick the Slots’ field
-
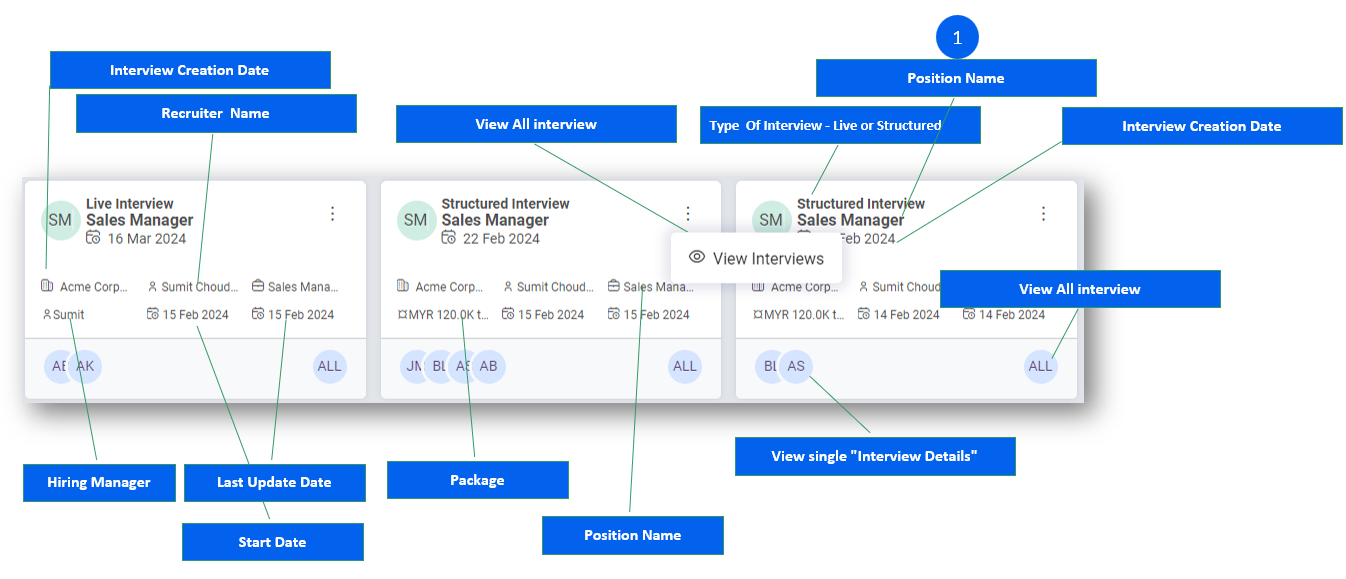
1 Click on , Position Name, to open all interviews pertaining to the position.
-
2 One can look at top of interview card and see the type of interview whether Live or Structured.
-
3 The Interview Card provides additional details such as the ‘Interview Creation Date’, ‘Start Date’, ‘Last Update Date’, ‘Recruiter Name’, ‘View Interviews’, ‘Package’, and more. It serves as a comprehensive snapshot of the interview’s key information.
-
1 Navigate to the ‘Interview’ tab and select the ‘View All’ option on the Interview Card.
-
2 The ‘Interview Pack’, i.e., all the interviews conducted for this particular position, will be displayed.
-
3 Select the ellipsis (3 dots) to "View interview" or to ‘Add Reviewers’ if necessary. (Only in case of completed interview)
-
4 From the same card, you can view the candidate’s profile by clicking on the candidate’s name.
-
5 Clicking “View Interview” will open the Interview Details page with specific information.
-
6 Interview details page shows details such as Interview Title, Job Title, Hiring Company, Created by/Recruiter, Hiring Manager, Date Created.
-
7 The “Candidate Details” section displays key information about the candidate, including their email, phone number, location, experience, and salary package. It also shows the candidate’s rating. Click the “eye icon” for more details.
-
8 The “Job Details” section includes the job title, company name, start and end dates, location, and number of openings, among other things. Click on the “eye icon” for additional information.
-
9 The “Scores” section provides the team’s rating, which is linked to the interview, as well as the individual rating of the person viewing the details.
-
10 The “Live Interview” recording allows you to play back the interview.
-
11 The “Score Board” section shows how many times a person has received a specific star rating, such as 10 stars, 9 stars, 8 stars, and so on.
-
12 The “Feedbacks” section includes the interview comments and ratings provided by both the reviewer and the hiring manager. The reviewer can be asked to view the interview and provide their insights based on the recording.
-
13 Click on the “Ellipsis (3 dots)” to change the interview, either to “on hold” or “cancel”. Please note that this action cannot be taken for interviews that have already been completed or rejected by the candidate.
One can assign reviewer also from this option.
-
1 Navigate to the ‘Interview’ tab and select the ‘View All’ option on the Interview Card you want to view.
-
2 The ‘Interview Pack’, i.e., all the interviews scheduled or yet not completed for this particular position, will be displayed.
-
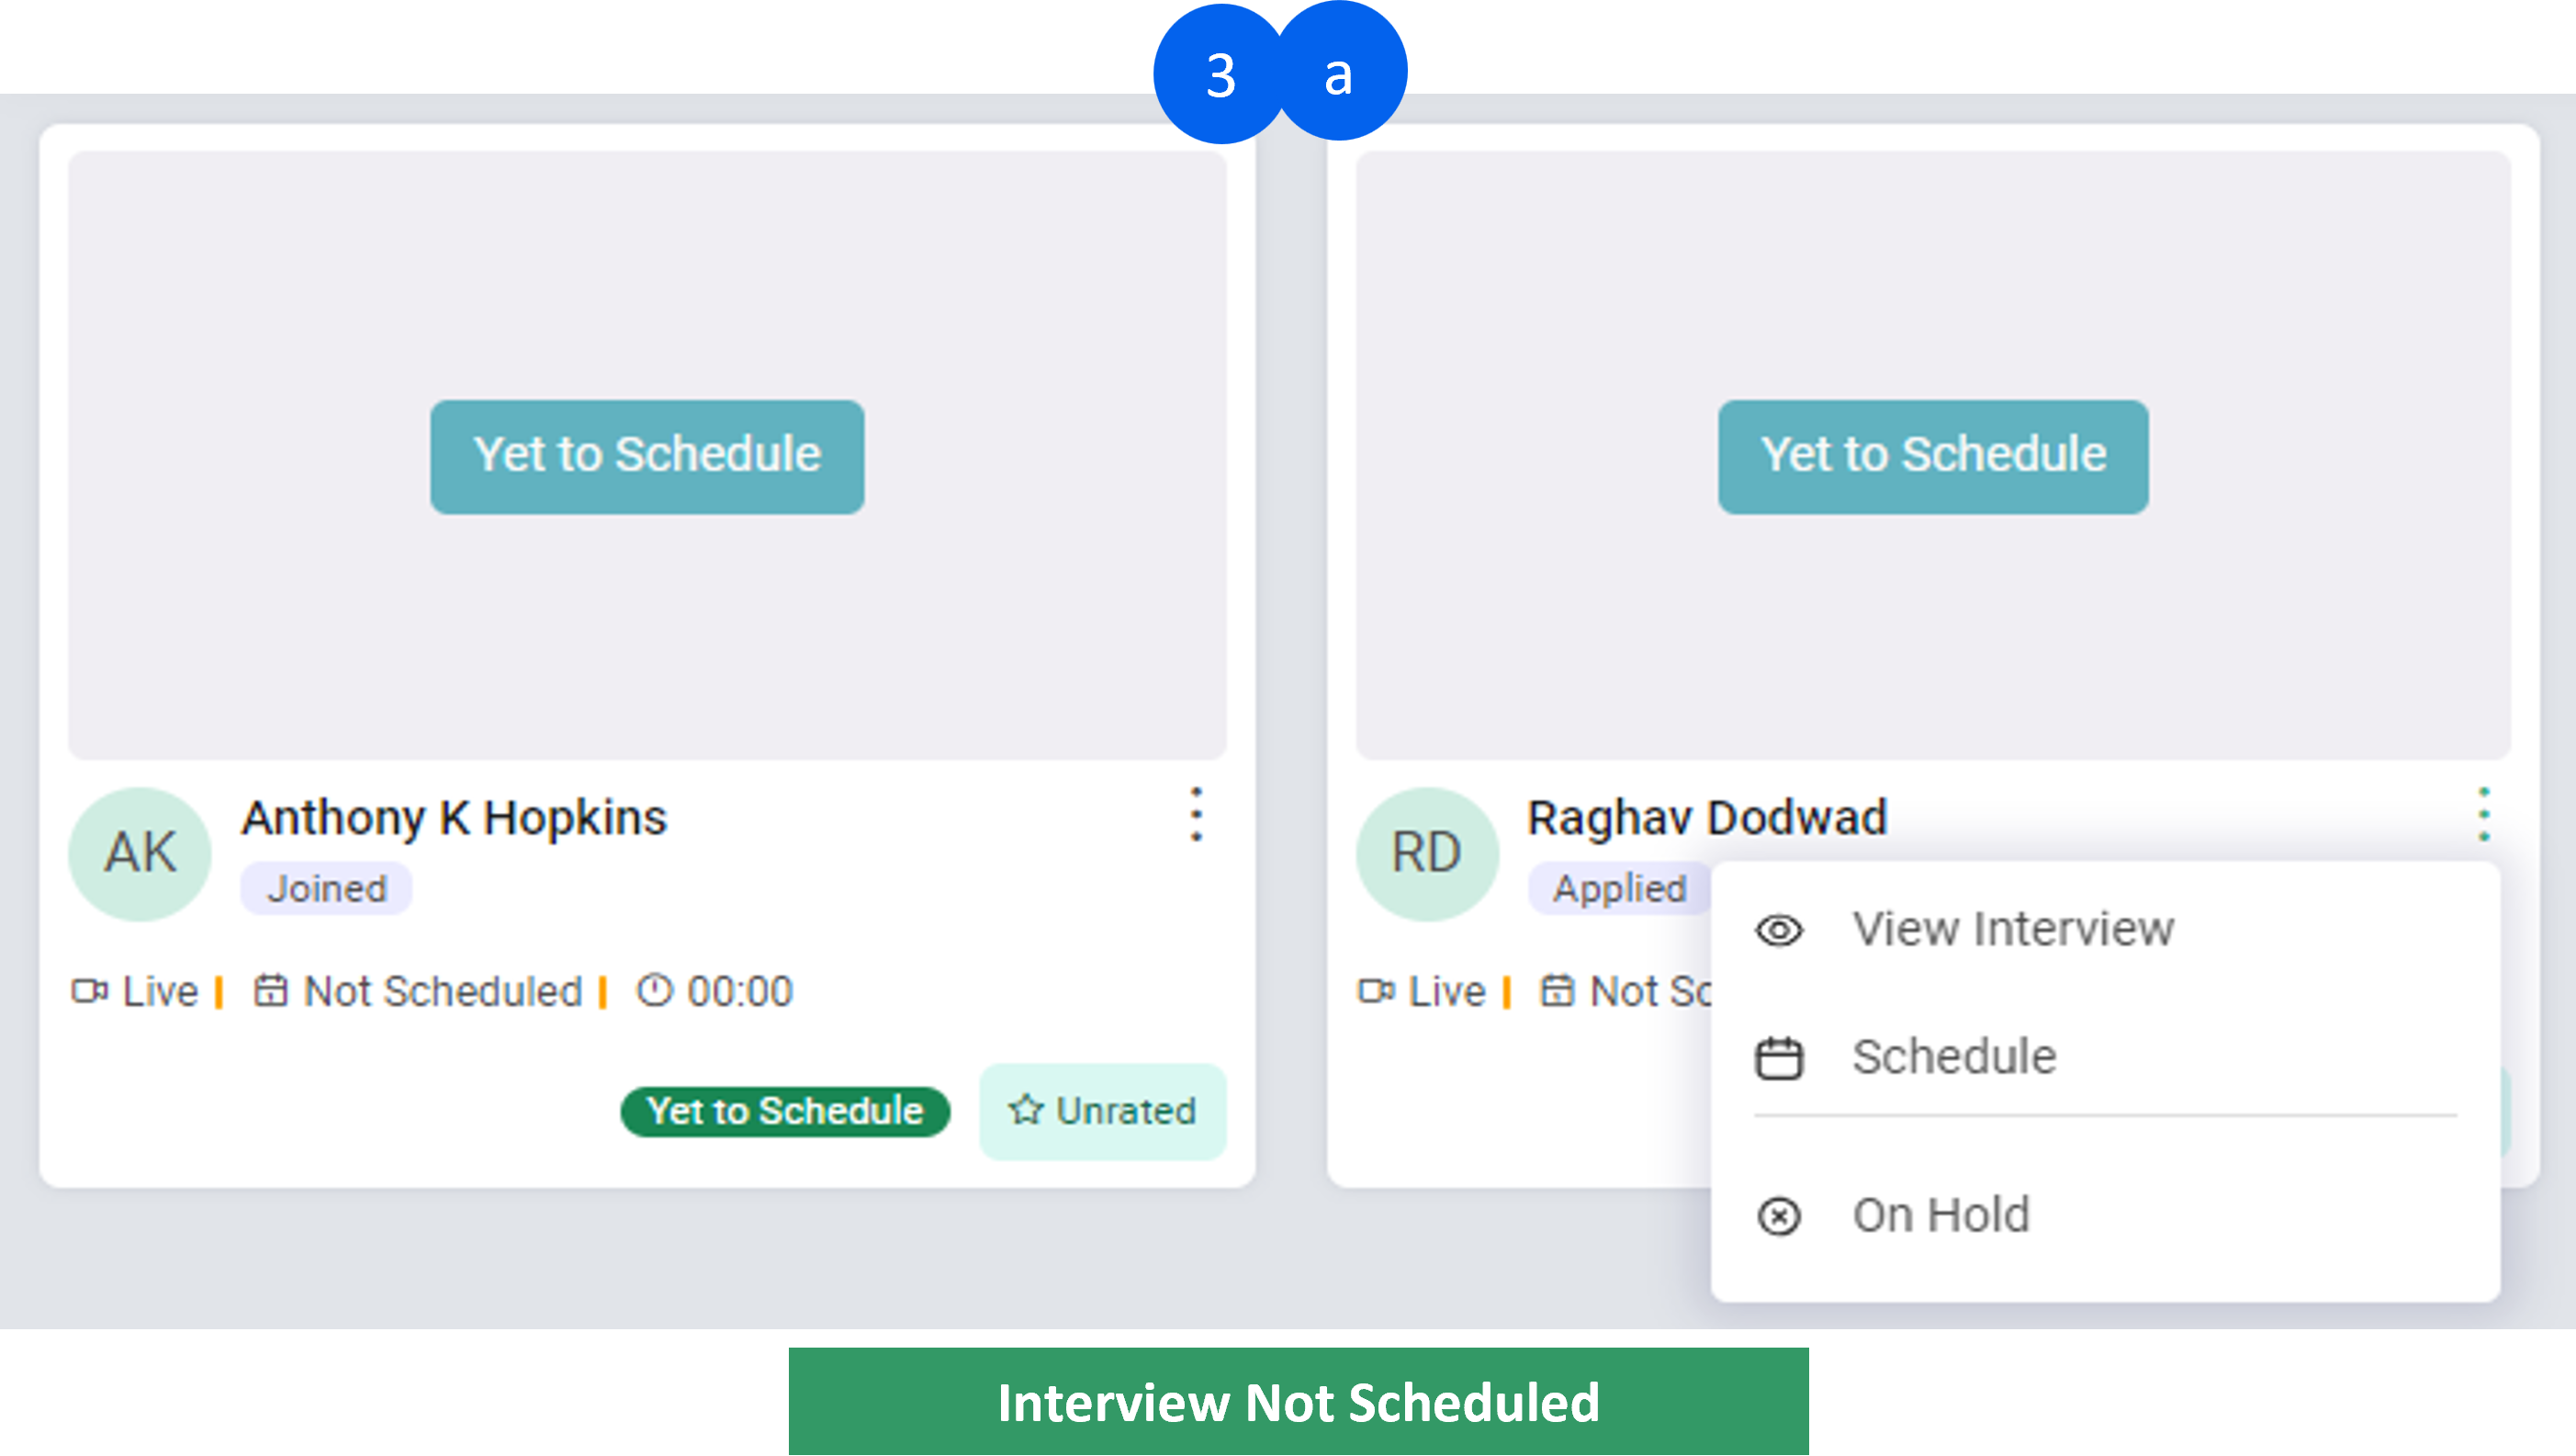
3 You can use the ellipsis (3 dots) to perform various actions depending on the type of interview card. These actions include “View Interview”, “Schedule Interview”, “Reschedule Interview”, “Hold Interview”, or “Cancel Interview”:
- For an “Interview Yet to Schedule”, you have the options to “View Interview”, “Schedule Interview”, or put the “Interview on Hold”.
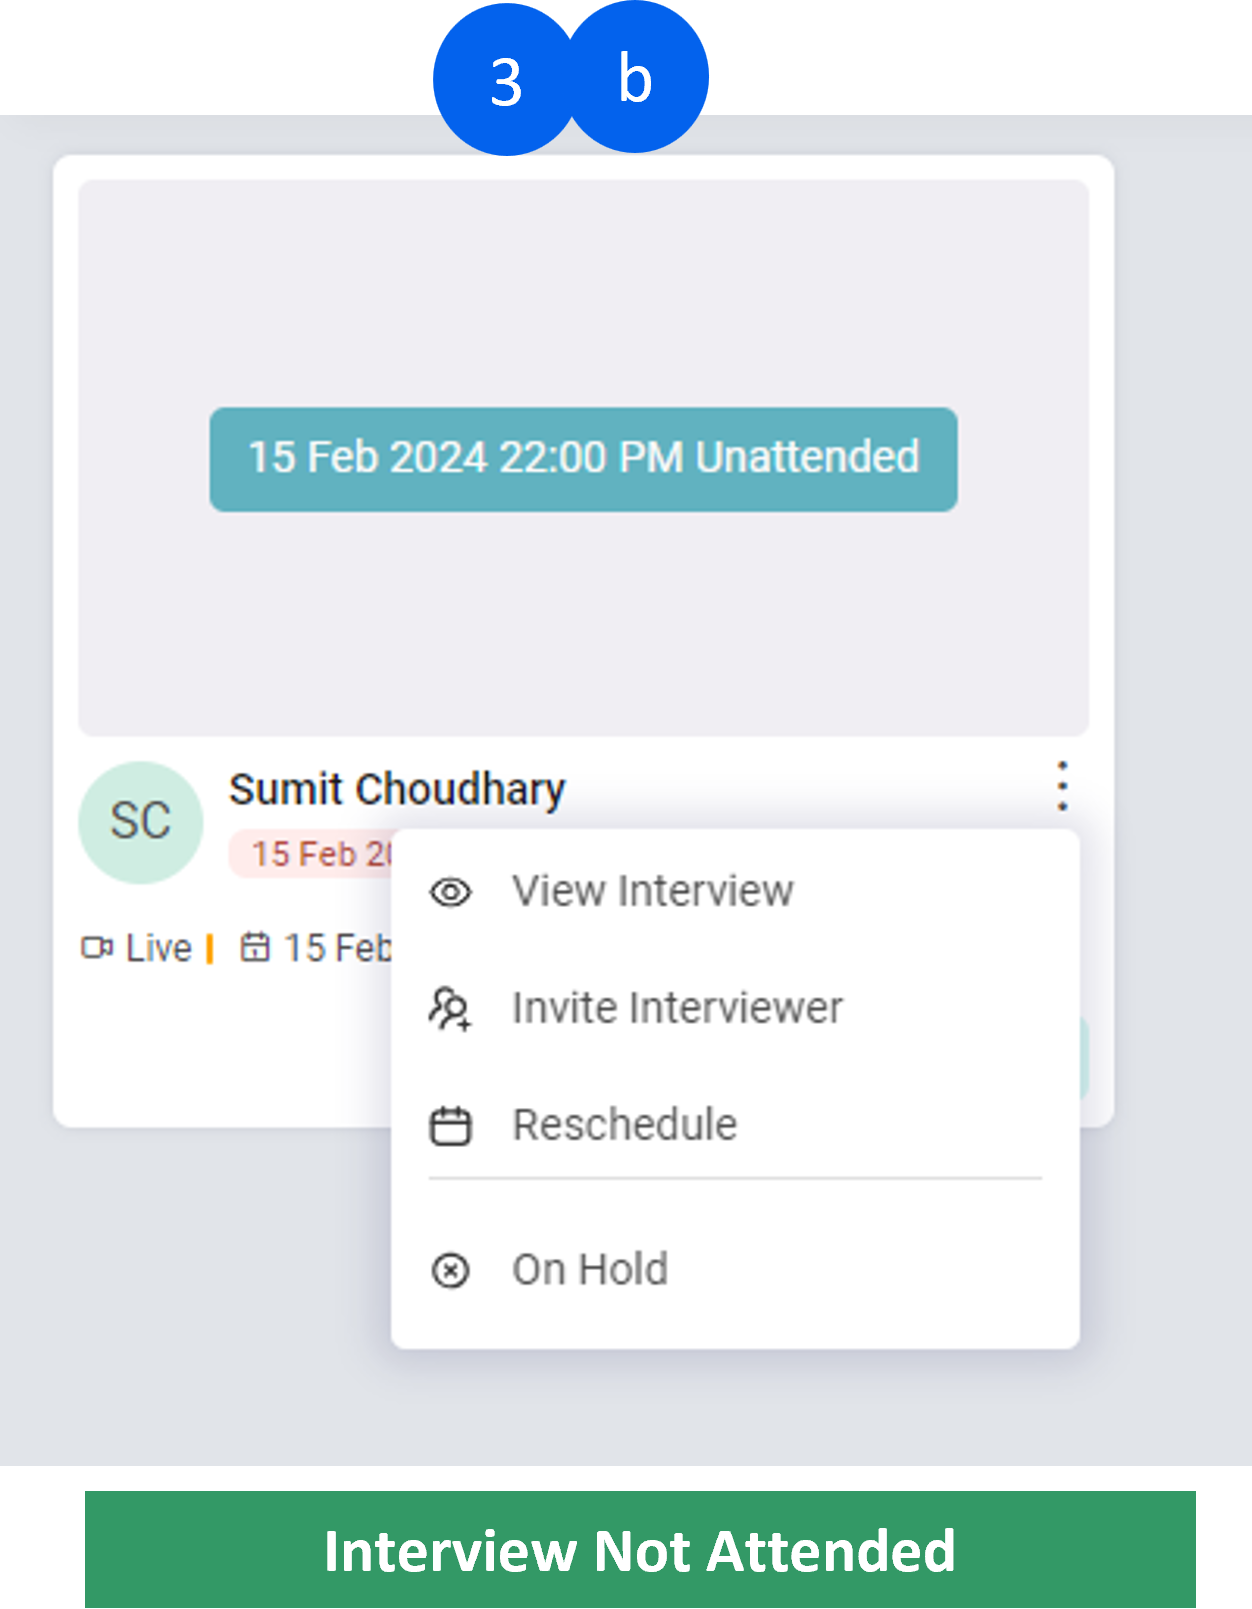
- For an “Interview Yet to be Attended”, you have the options to “View Interview”, “Invite Interviewer”, “Reschedule Interview”, or put the “Interview on Hold”
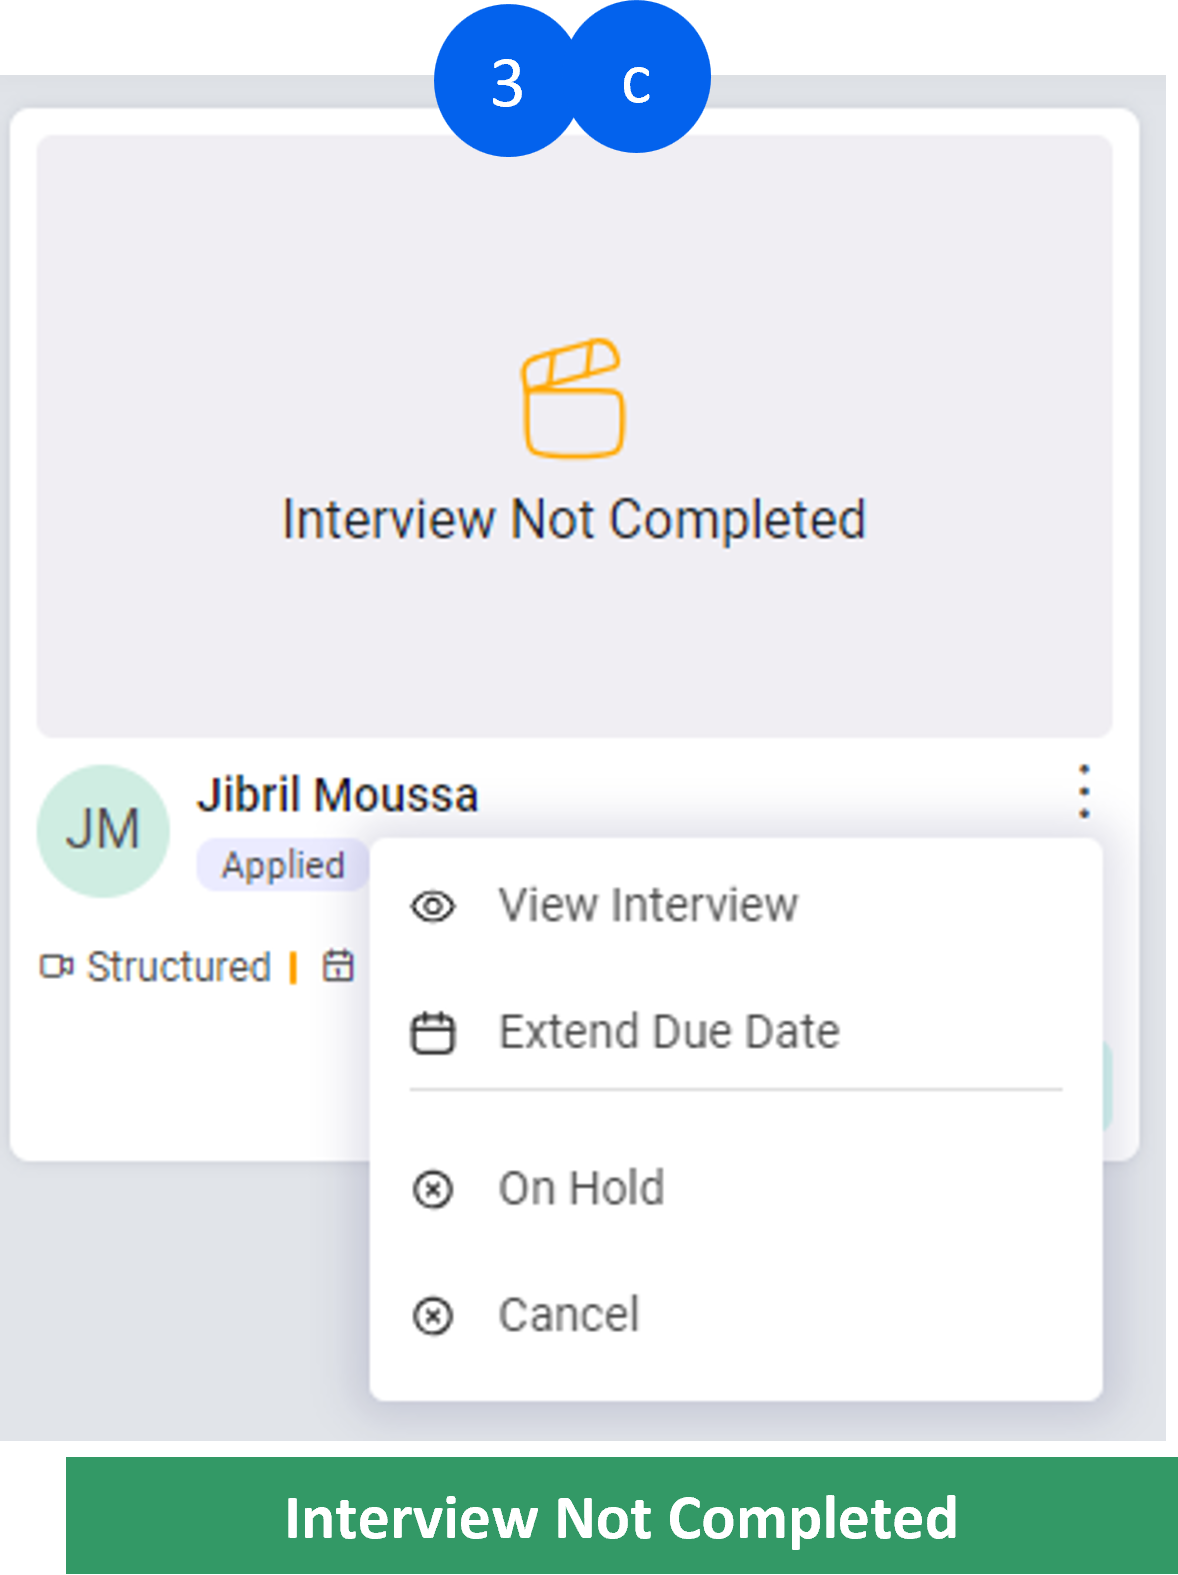
- "Interview Yet to be Completed" - in this you will get options to "View Interview" or "Extend Due Date" of interview or "Hold" Interview or "Cancel" the interview
-
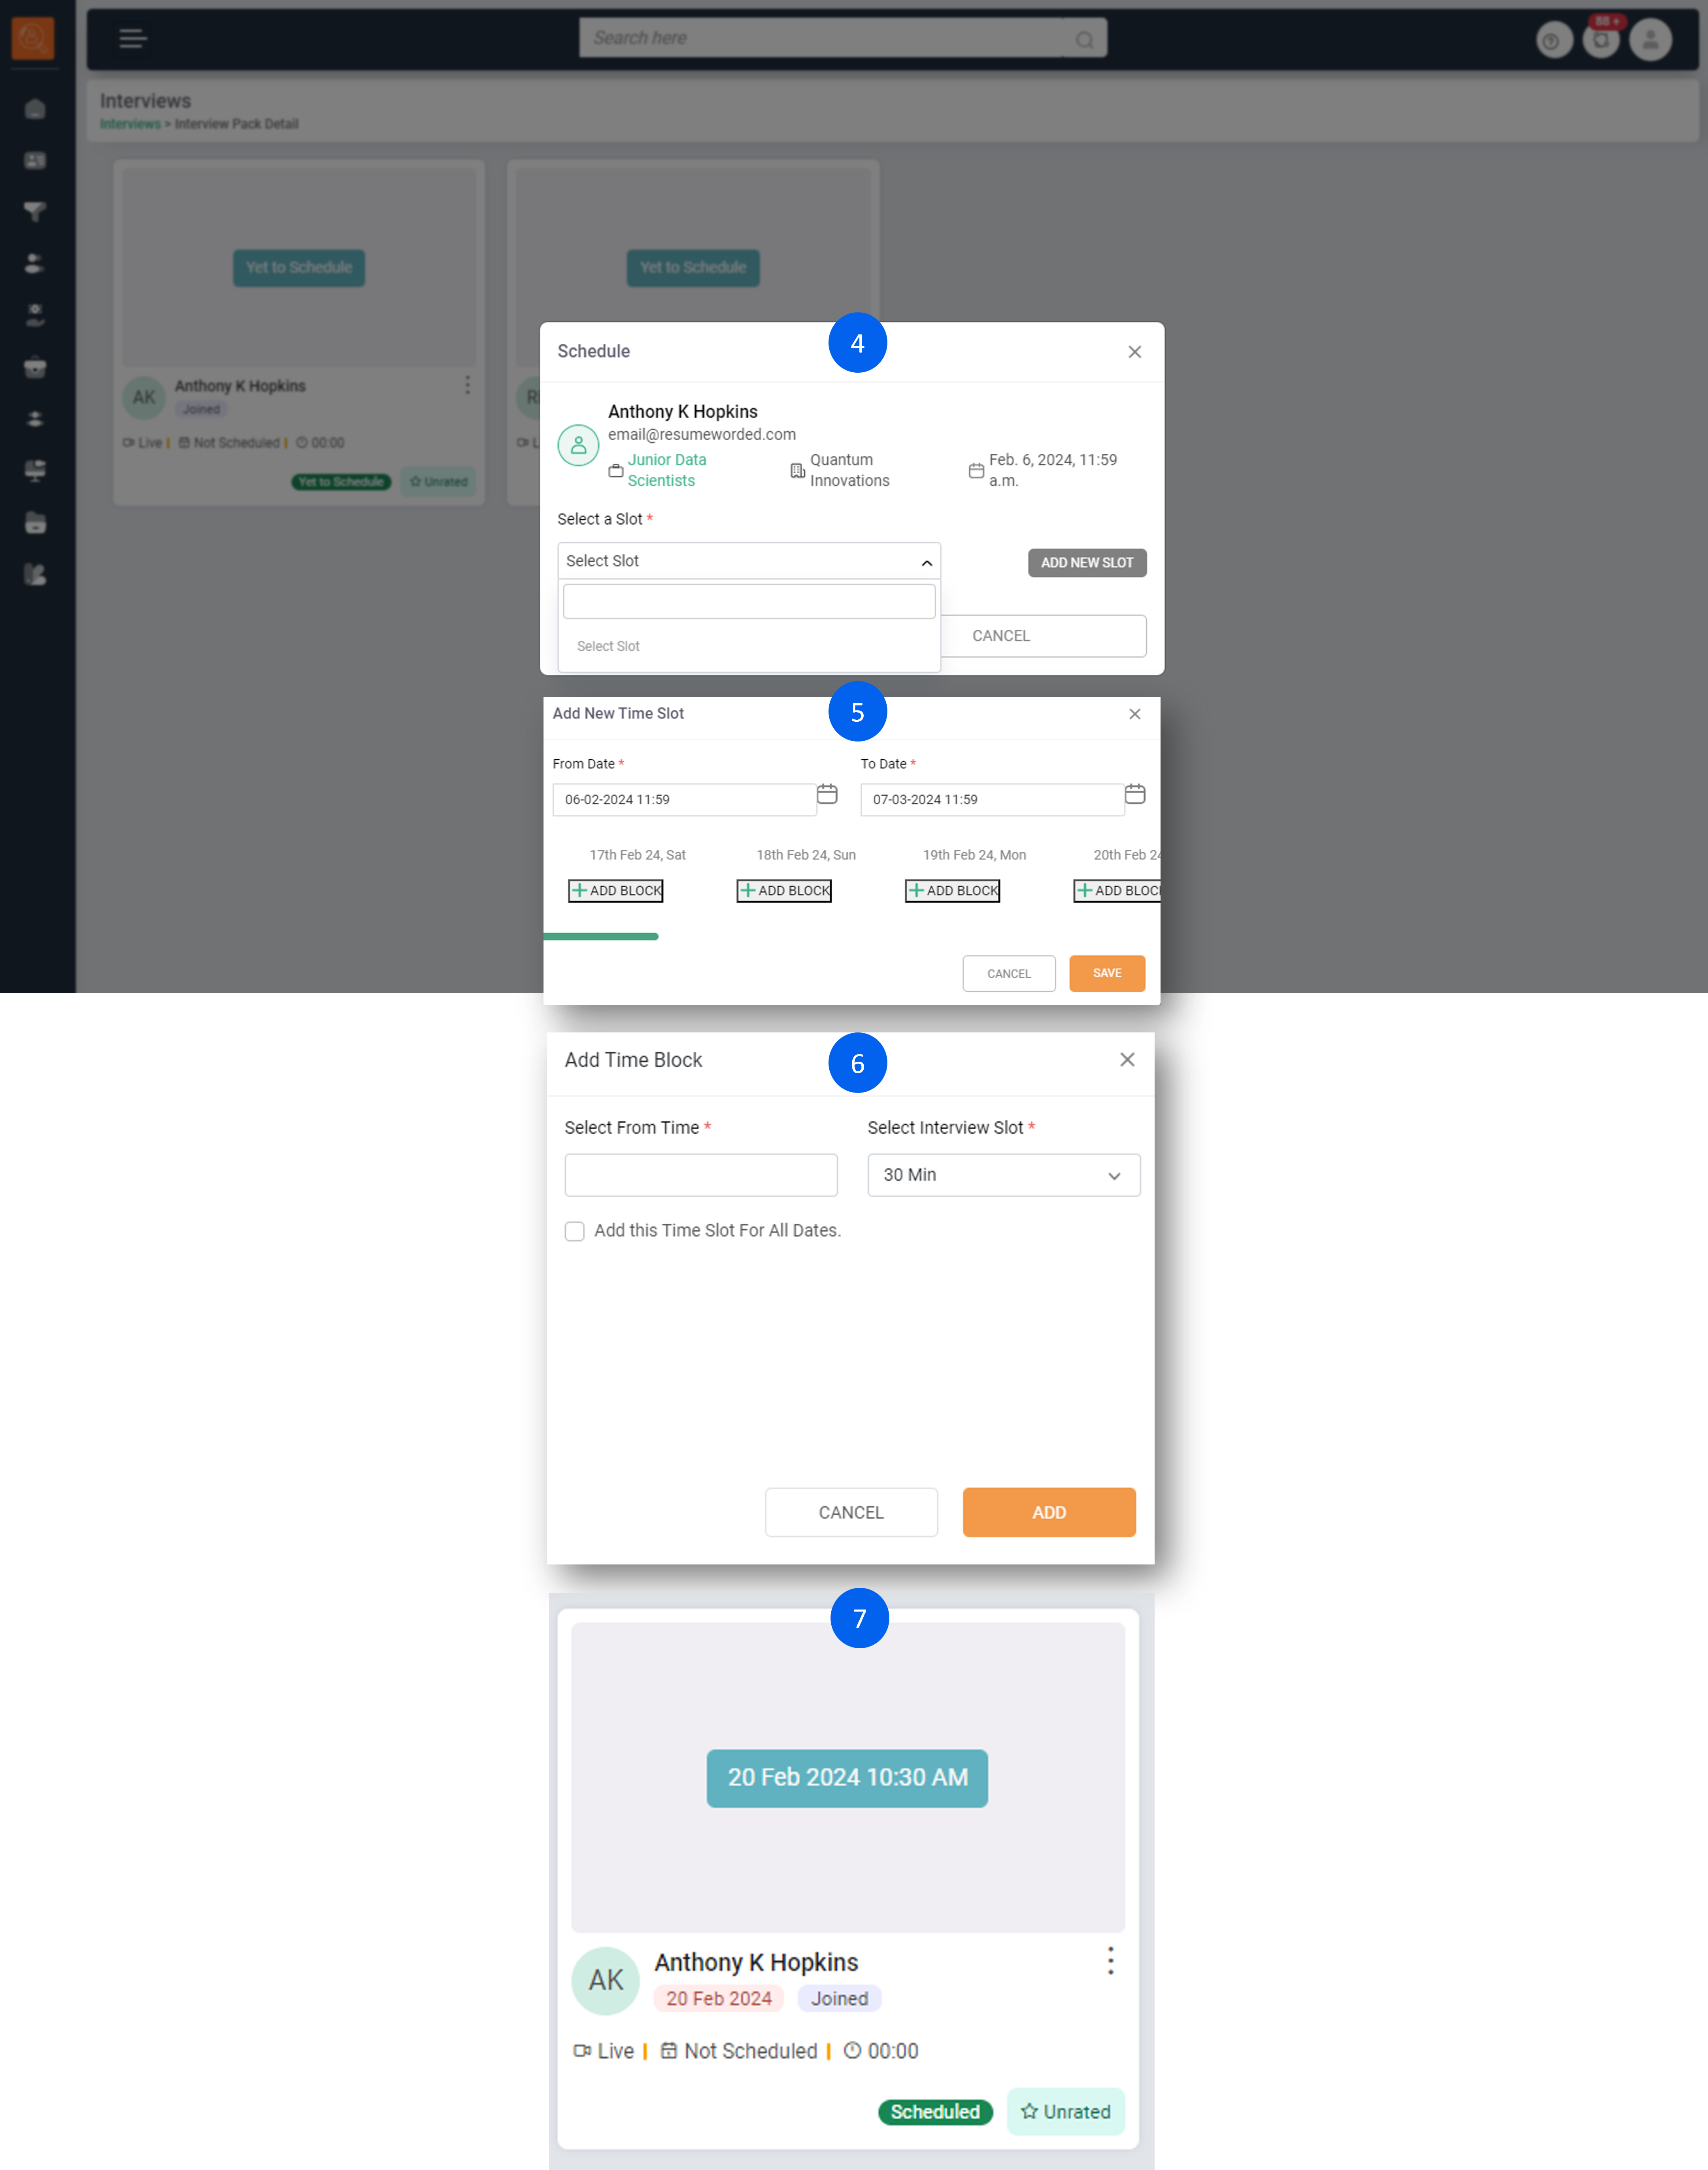
4 Clicking on “Reschedule” or “Schedule Interview” will open a window prompting you to add a new interview slot. If no additional slots were previously added, click on “Add New Slot”. Alternatively, you can select the next available slot from the dropdown menu.
-
5 When you click “Add New Slot”, a new window will appear. In this window, you should enter the “From Date” and “To Date”. These dates represent the range within which the interview can be scheduled.
-
6 For each date, you have the option to “Add Time Block”, which are the specific time slots when the interview can take place. If you want the same time slot to apply to all the selected dates, you can check the option “Add this time slot for all Dates”.
-
7 Once you’ve scheduled the interview by adding a new slot, the updated schedule will be visible on the interview card. This makes it easy to see the new interview time at a glance.
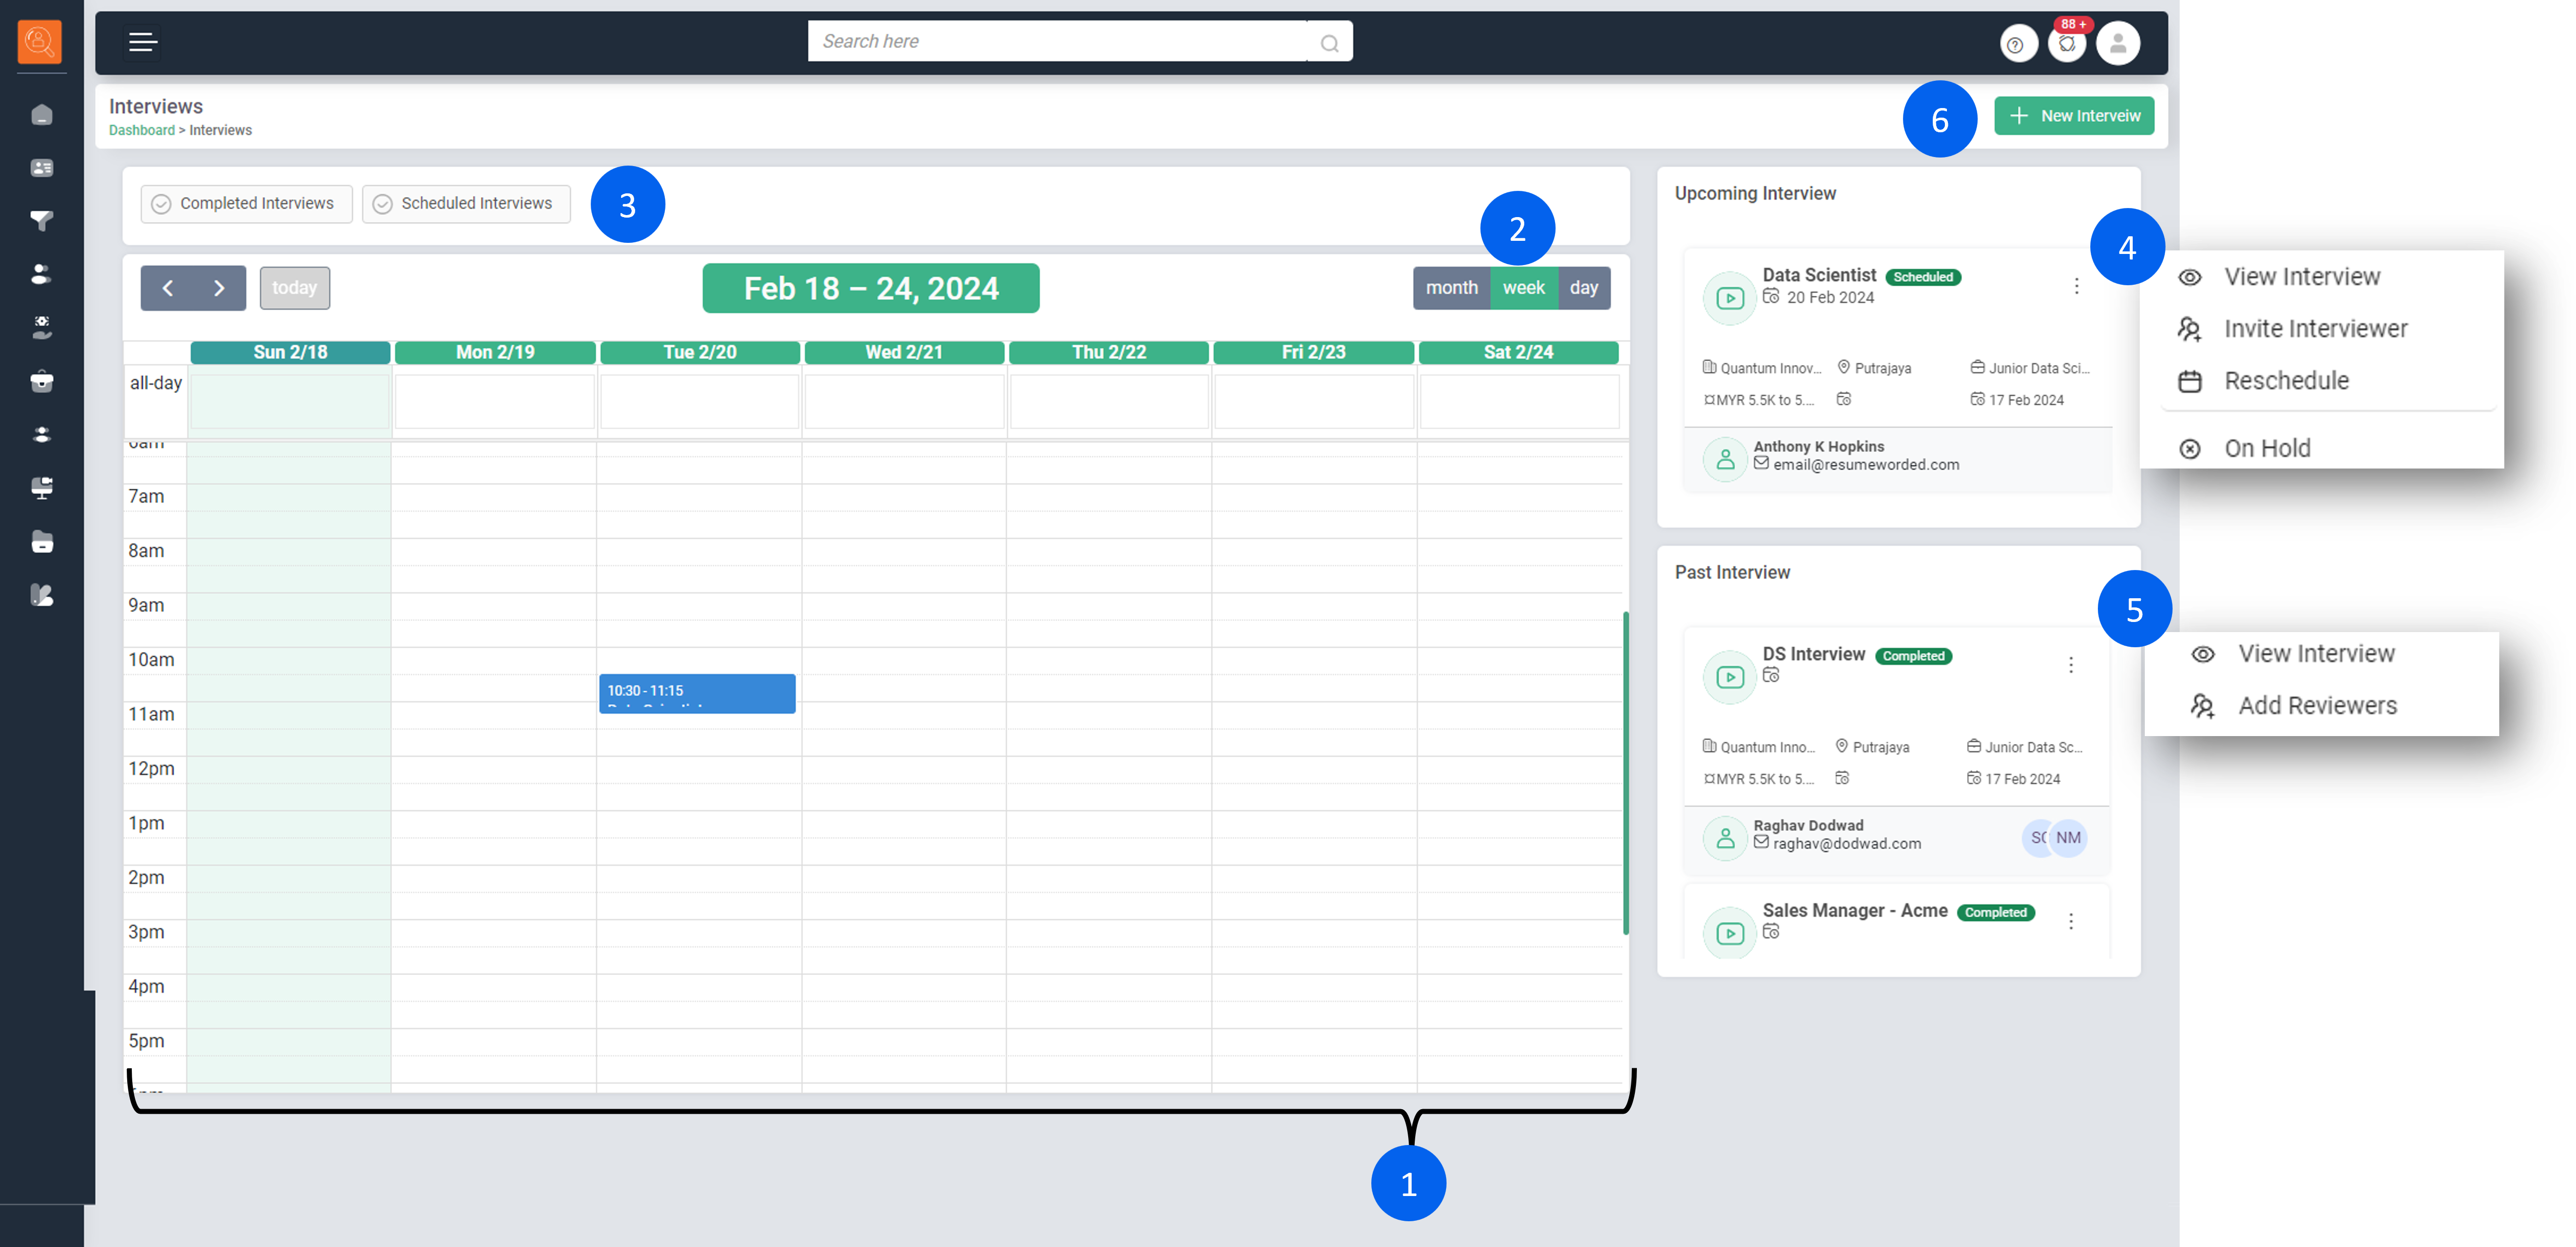
“Interview planner” is a feature for easy interview scheduling and viewing.
-
1 The Interview Planner page presents an array of time slots, each containing the interviews scheduled within them.
-
2 The Interview Planner allows you to view scheduled interviews on a daily, weekly, or monthly basis.
-
3 You can filter interviews by clicking on "Completed Interviews" or "Scheduled nterviews can be filtered by selecting either “Completed Interviews” or “Scheduled Interviews”.
-
4 The “Upcoming Interview” section provides a list of interviews scheduled for the coming days. From this section, you have the options to “View Interview”, “Invite Interviewer”, “Reschedule”, or “Hold” the interview.
-
5 The “Past Interview” section displays all previously completed interviews. From this section, you can directly "Add a Reviewer" to an interview or "View the details of the interview".
-
6 To schedule a new interview from the Interview Planner page, simply click on the “Create Interview” button.