-
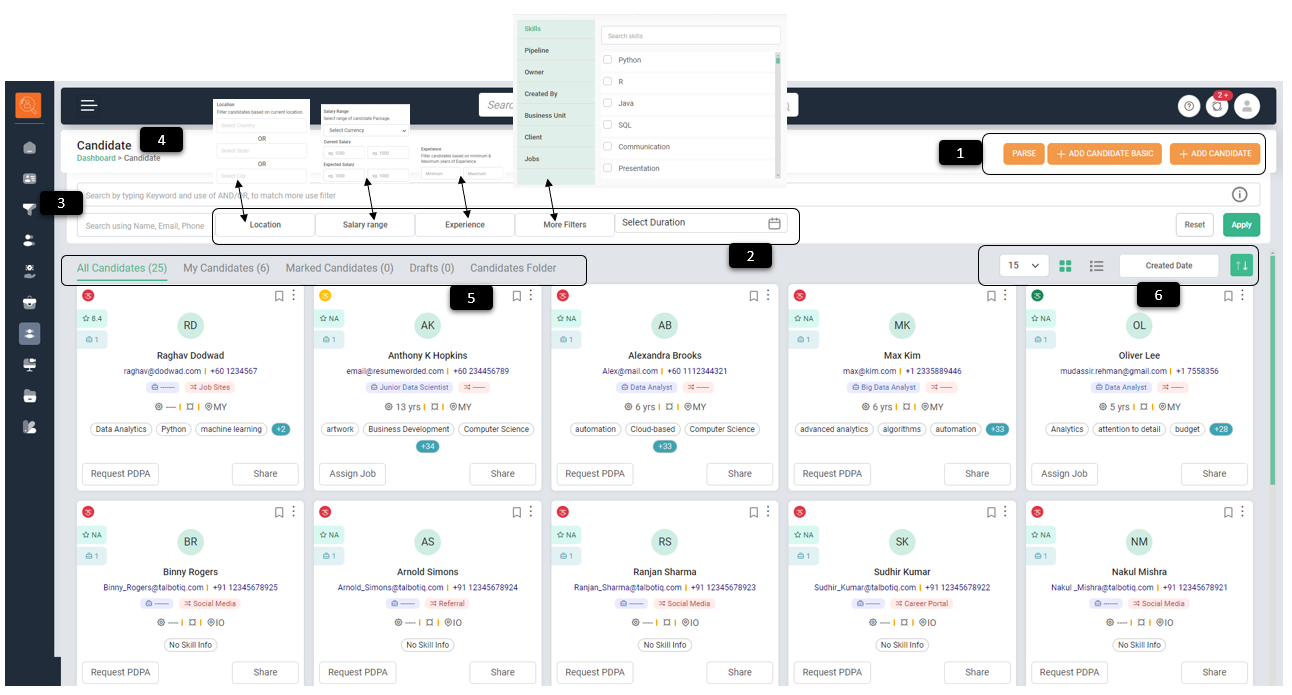
1 Add Candidate - Use this option to create a candidate profile
- Parse - Click on this to auto-extract candidate details from available resume (standard formats such as .pdf, .doc) to create profile.
- Add Candidate Basic - Use this option to enter basic details required to create candidate profile.
- Add Candidate - This options gives detailed fields to enter information pertaining to candidate profile
-
2 Filter Bar - To filter page content as per various parameters e.g. Location, Salary Range, Experience, Date (Weekly, Monthly, Quarterly, Yearly and Custom Date) and more filters such as Skills, Pipeline, Owner, Created By, Business Unit, Client, Jobs.
-
3 Search Bar - To search candidates basis their name, email & phone number. Boolean search option is also given, which is a specific type of search allowing users to combine keywords with operators like AND, NOT and OR to make the search results more relevant.
-
4 Navigation Icons - Use this to navigate to pages (it will take one to the page highlighted in green e.g. Dashboard).
-
5 Candidates Sub Tabs - These are quick view options to view Candidates as "My Candidates", "Marked Candidates", "Drafts" and "Candidate Folder" giving recruiter flexibility to create folders of candidates with similar parameters.
-
6 View & Sort Options - For ease of viewing such as number of Candidates to be displayed per page, whether in list or card form. One can also sort candidates basis "Name", "Created Date", "Activity", "Location", "Experience" & "Package".
How to create a Candidate?
-
1 Create Contact - Use this option to create a new contact
Parse - With out inbuilt parsing technology one can create and add candidate data from resume directly to various fields e.g. General Details, Employment Details, Education Details, Certification details, Skills in few click of buttons.- Add Candidate Basic - This option helps to create candidate profile even if only essential details of the candidate such as Name, Email & Phone number are available. It is recommended to ensure remaining details should be added later on.
- Add Candidate - This option is used to add all the relevant details pertaining to candidate in a comprehensive manner. Refer section below to see step by step process.
- Add Candidate by Uploading CSV - This options gives option to upload basic details of multiple candidates to be uploaded in one go. Refer below Section to know more.
- Bulk candidate upload via CSV file - One can also bulk upload candidate details via Excel Sheet. Refer section below to know step by step process.
- Add Candidate from "Career Site" - Oany candidate when applies to a Published Job, gets added in the candidate tab as draft candidate, refer section below to know more.
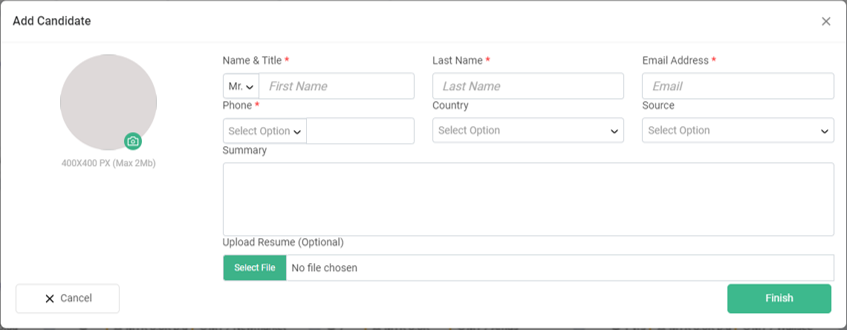
Add Candidate, detailed step by step process.
-
1 Click on "Add Candidate" a new window "General" will open. Add basic details such as Salutation, Name, Gender, Phone, Email, Total Experience, Notice Period, Job Title, Salary, Expected Salary, Date of Birth, Qualification, Address, Location, Source of candidate profile and "Owner" i.e. who sourced candidates profile. You can use summary to describe in brief about the candidate profile.
-
2 Click on "Next" button on top right hand side, now the tab with "Employment" details will open, add information such as "Organization" name, "Job Title", "Salary", "Job Type", "Country", "State", "City", "Duration" and "Summary". In Duration fill "Start Date" and "End Date". If it is the current Job of candidate turn on "Current Employer" option.
- Use "Add More" option to add details about various companies candidate worked with In the past.
- In case there are discrepancies in any of the employment history you can edit the same or "delete" by clicking on delete icon at the right hand side lower corner of that employment detail.
-
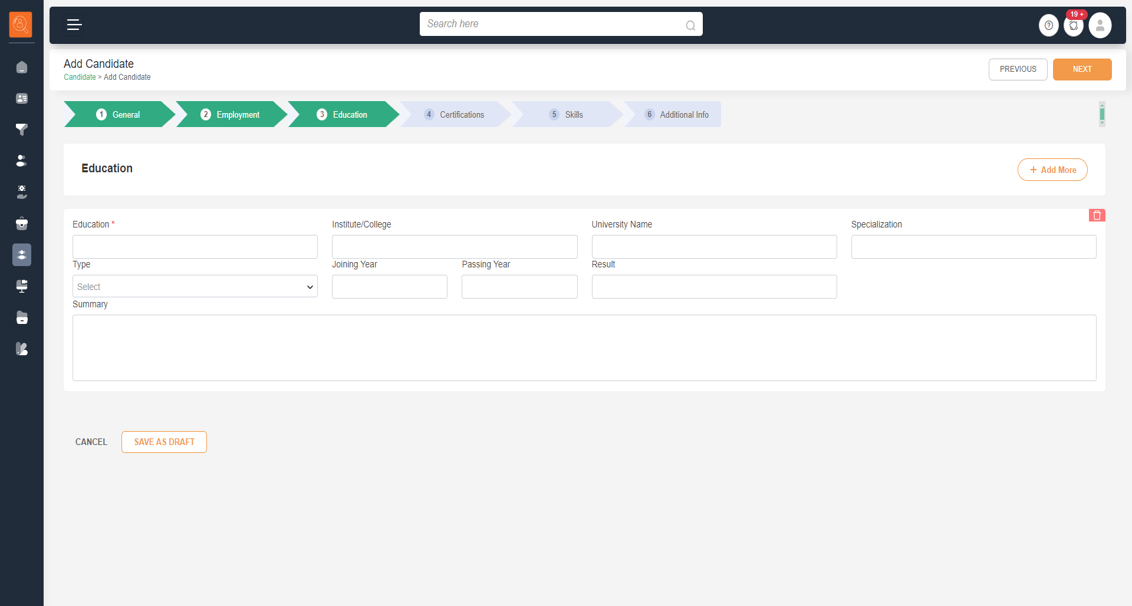
3 Click on "Next", now add details about candidate's "Education" such as "Education Level", "Institute/College" name, "University Name", "Specialization", "Type" i.e. Fulltime, Parttime or via correspondence, "Joining Year", "Passing year" and "Result". Use "Summary" to add more details, if required.
- Use "Add More" option to add other educational details such intermediate, Graduation, Post-Graduation, Ph.D.. Etc.
- In case there are discrepancies in any of the education history you can edit the same or "delete" by clicking on delete icon at the right hand side lower corner of that education detail.
-
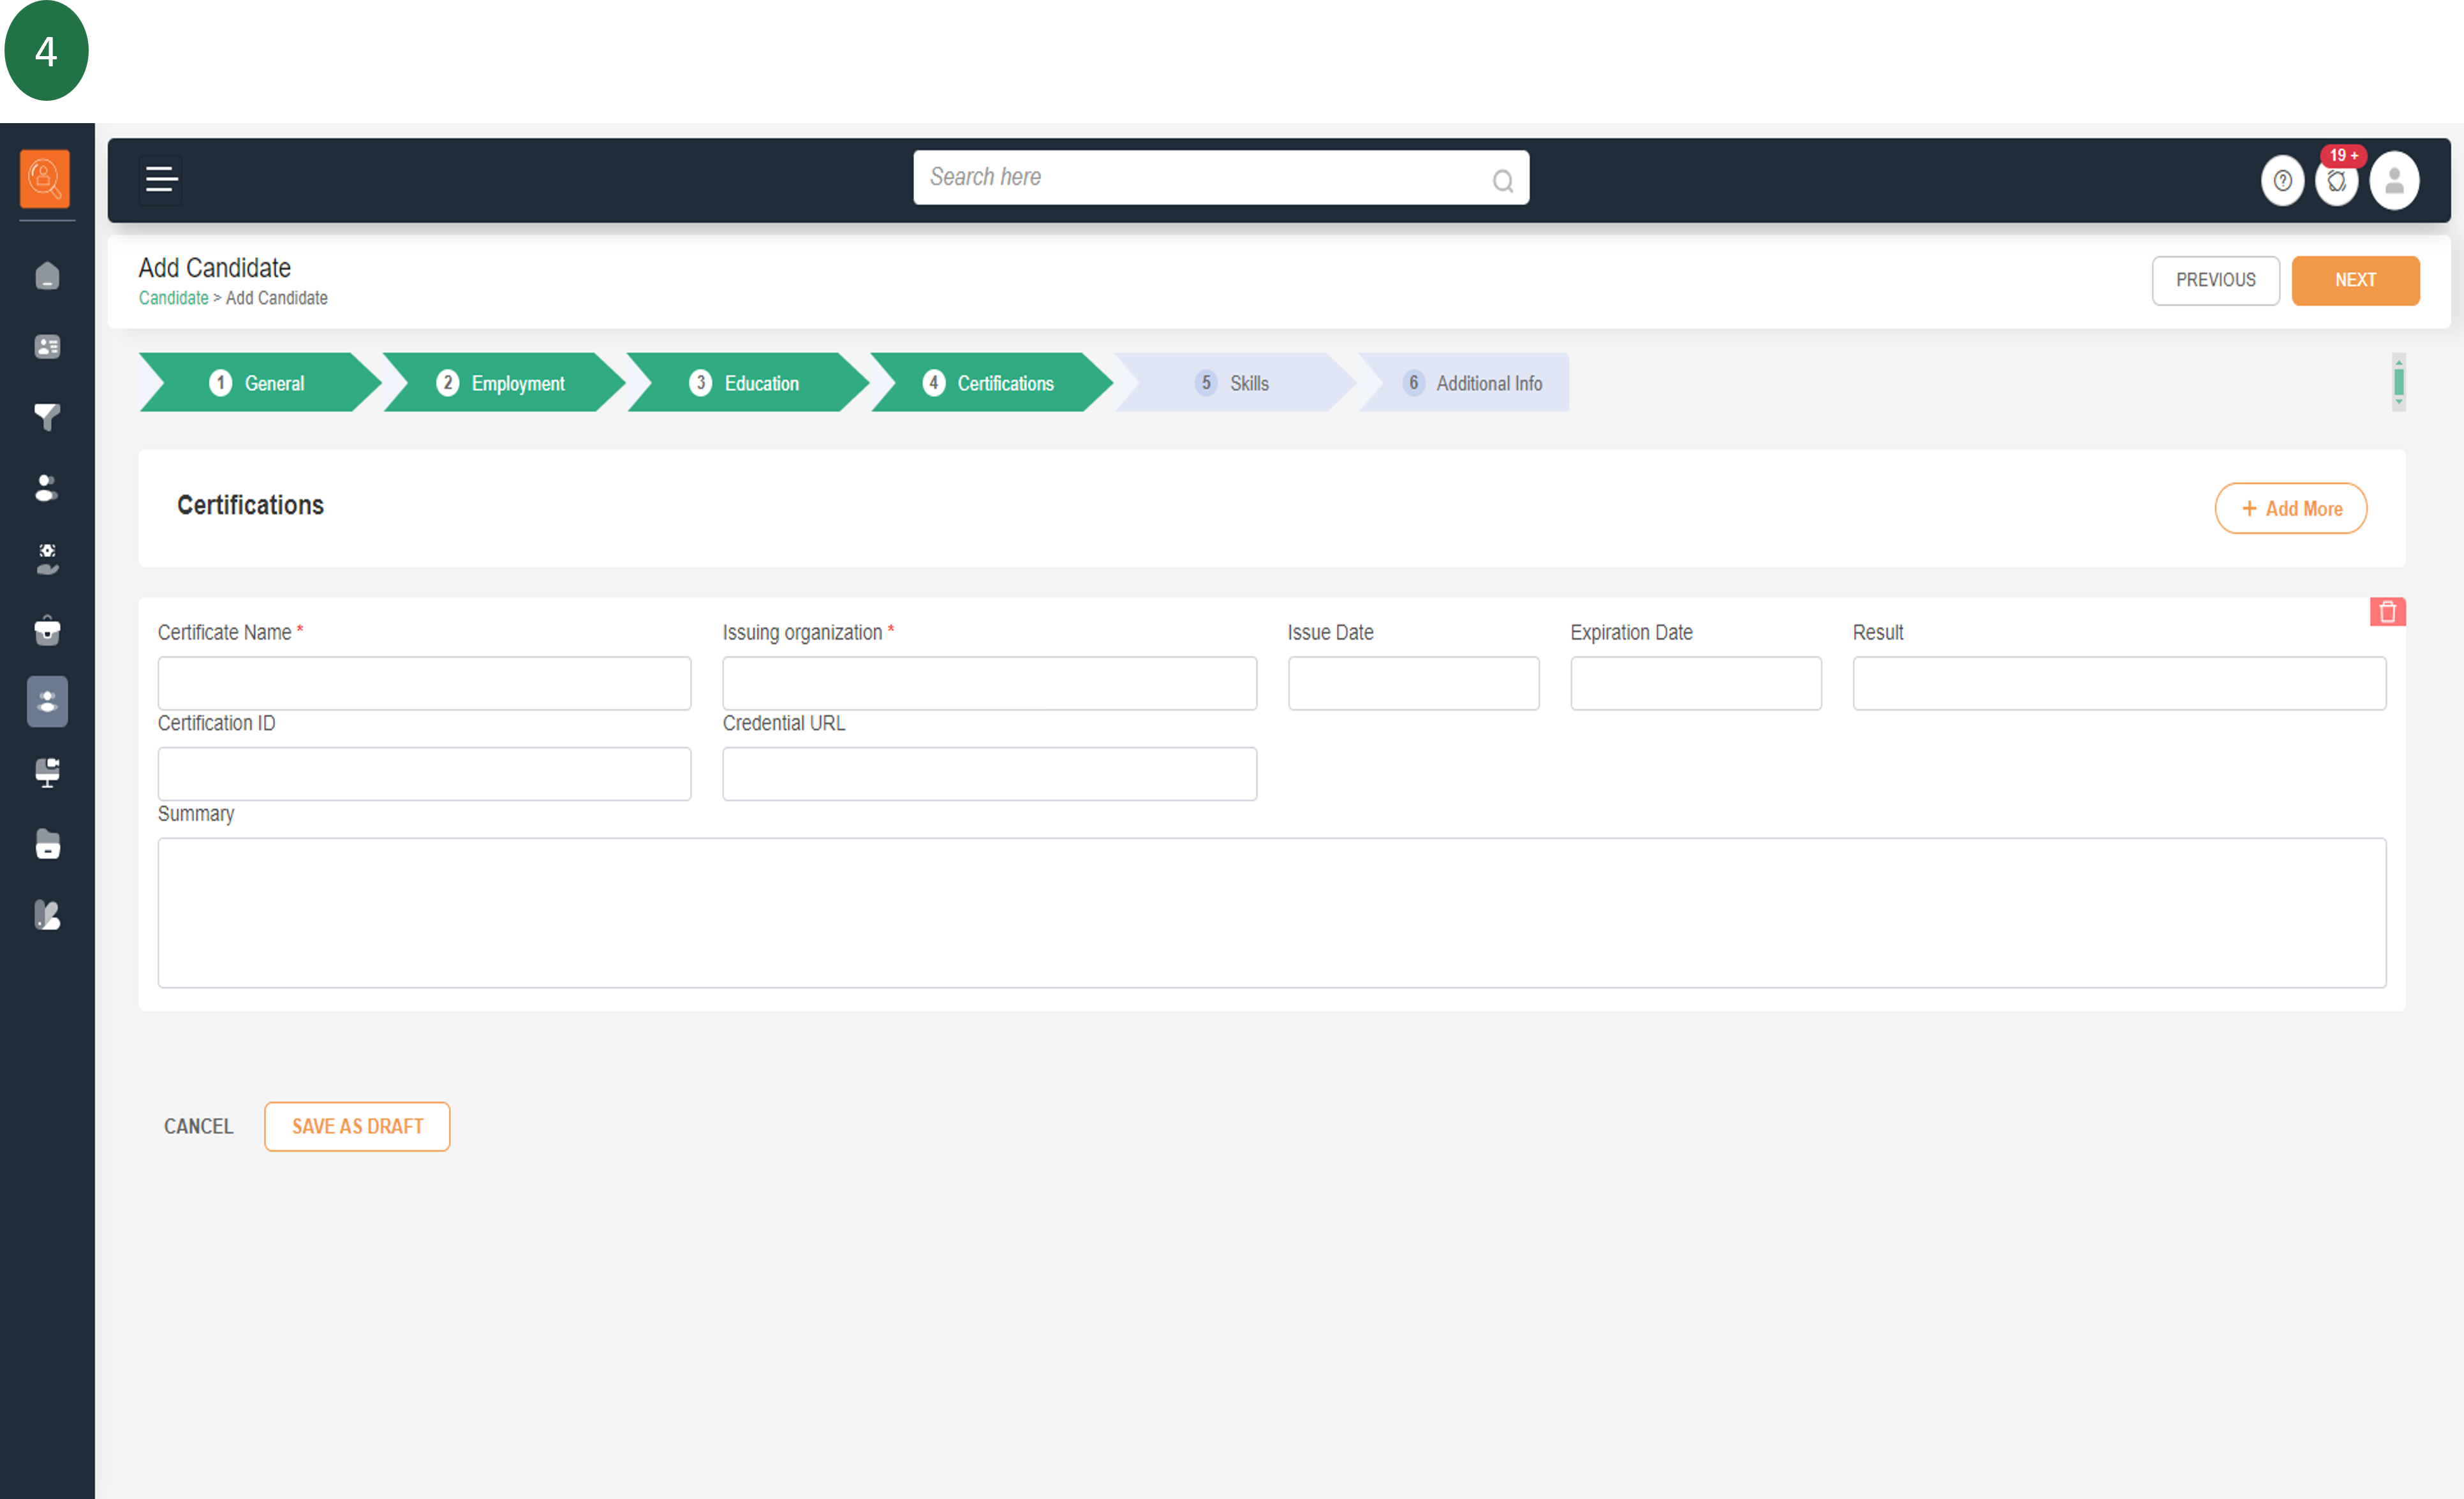
4 Click on "Next", now add details about candidate's "Certifications" such as "Certificate Name". "Issuing Organization", "Issue Date", "Expiration Date", "Result", "Certification ID", Certification URL" and "Summary". Use "Summary" to add more details, if required.
- Use "Add More" option to add more certifications
- In case there are discrepancies in any of the education history you can edit the same or "delete" by clicking on delete icon at the right hand side lower corner of that education detail.
-
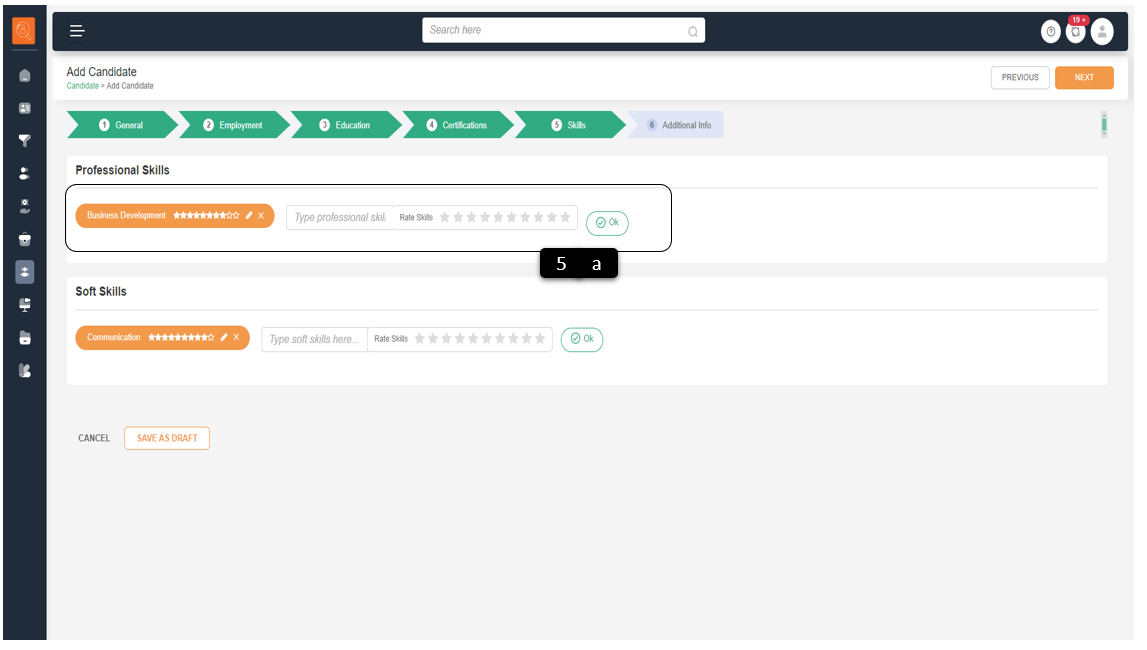
5 Click on "Next", now add details about candidate's "Skill" i.e. Professional Skills & "Soft Skills"
- Type the skill name in to field provided and give a star rating for the candidate. Click "OK", this will add the skill. Keep on repeating the steps for number of skills to be added for the candidate.
- Parsing feature automatically reads the candidate profile and suggests skills to be added for the candidate.
-
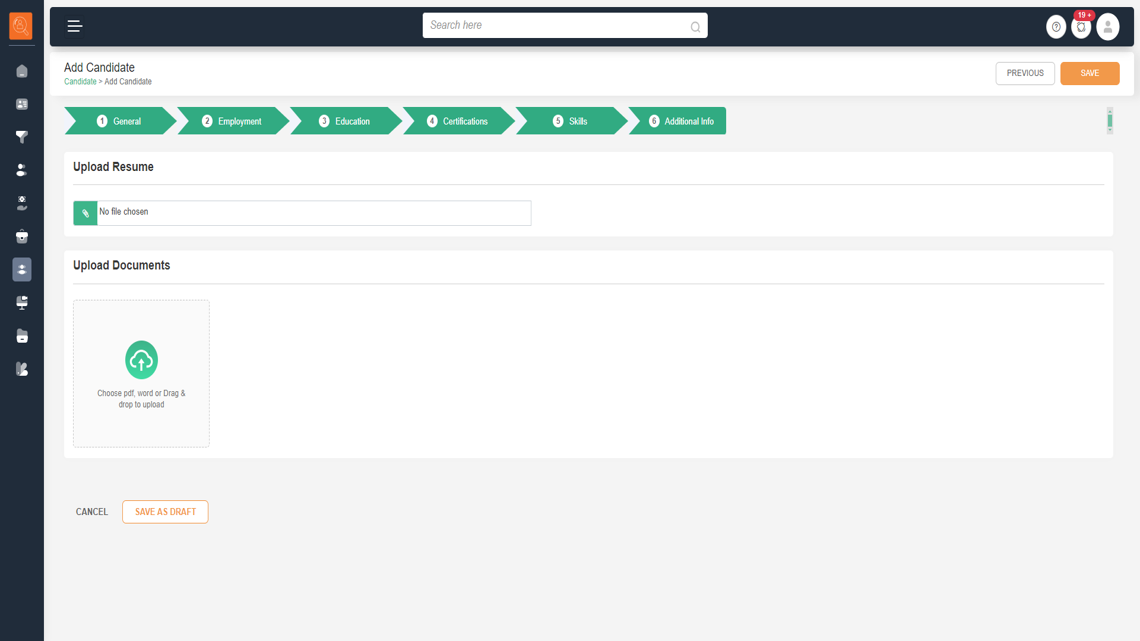
6 Click on "Next", now add "Additional Info" about candidate.
- Here you can "Upload Resume" or "Upload Documents" such as projects, content, salary slips related to candidate.
Overview of Bulk Candidate Upload using excel .csv file
-
1 Go to "System Icons" on top left hand side and click on "Administration"
-
2 Go to "Settings" and click on "Candidate Settings"
-
3 Click on "Upload" button on top left hand side on the "Candidate Settings" screen.
-
4 A pop-up window will open asking to "Upload CSV", click on the same and select the file to be uploaded and click on "Upload" Button.
Note: Download the .CSV file and add relevant data fields -
5 The uploaded candidates will appear as draft in candidate tab, click on the profile complete the required details and save the candidate profile.
Add Candidate from the "Career Site"
-
1 Go to "System Icons" on top left hand side and click on "Administration"
-
2 Go to "Settings" and click on "Job Settings"
-
3 Scroll down to know URL of "Career Site"
-
4 Whenever a candidate applies on the "Positions" published on Career Site after filling up the application form, candidate details will reflect in Candidate tab as "Draft".
-
5 Click on the "Draft Candidate Card" fill in the details as mentioned in "Create Candidate" section and save the profile. Now the candidate will reflect in the system.

-
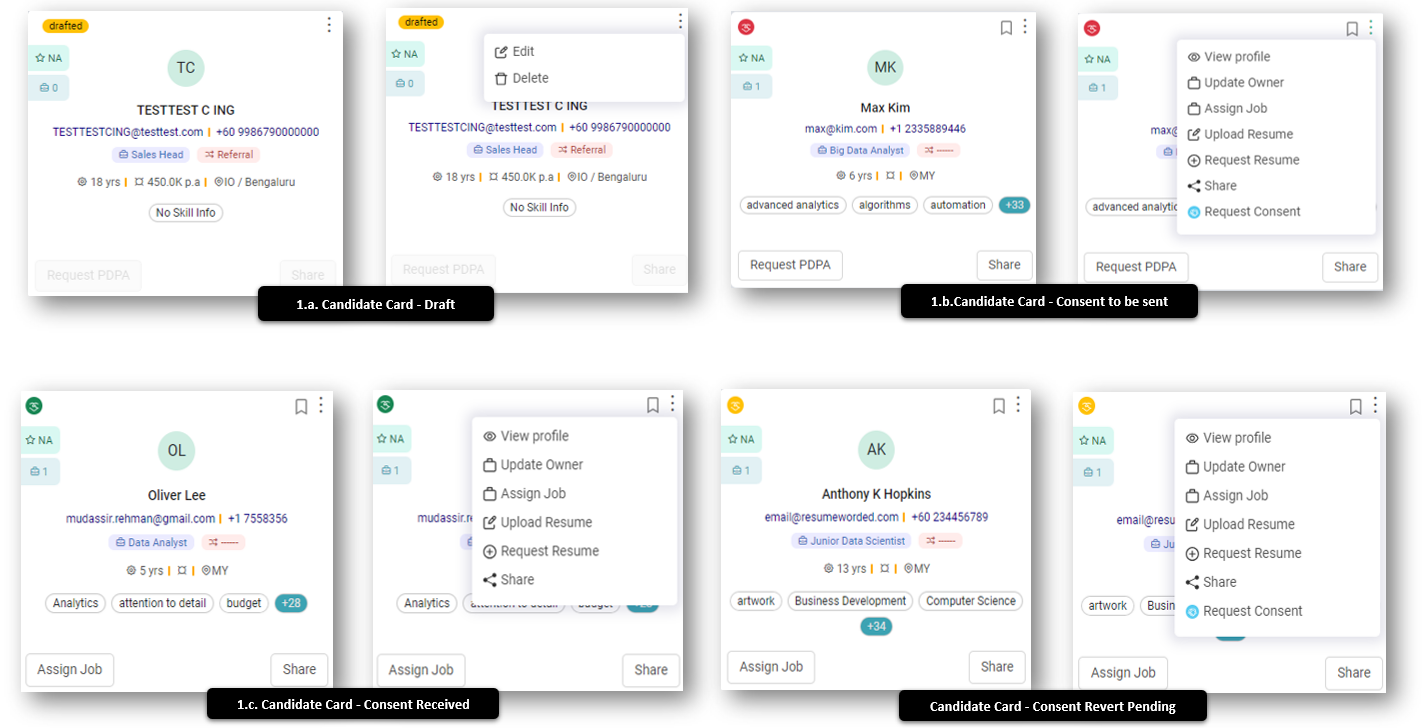
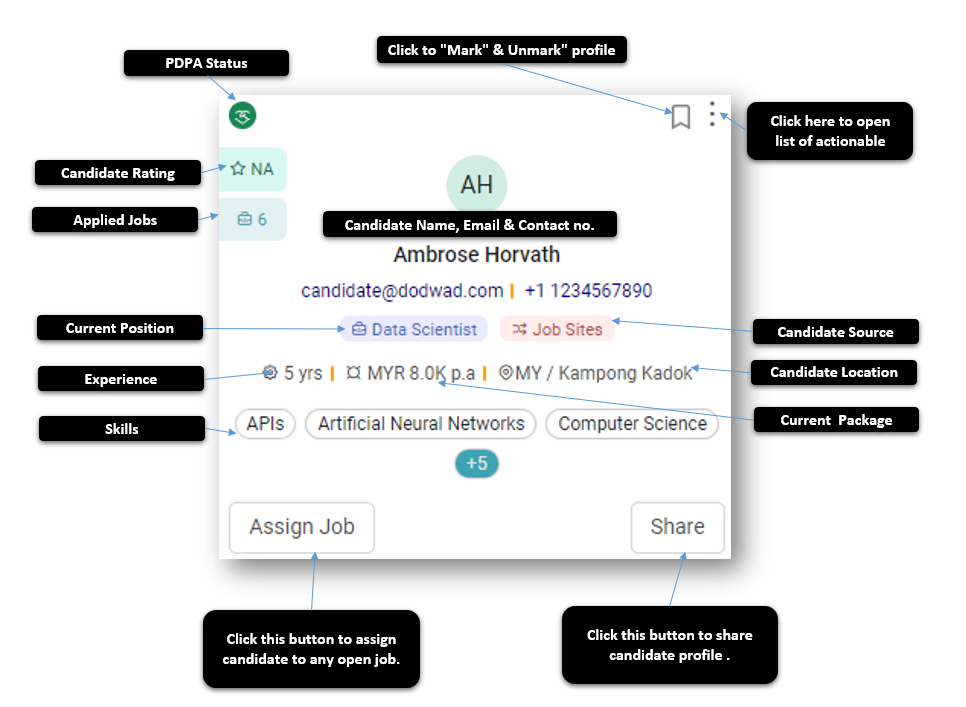
1 In the candidate tab one can view candidates in a list format as well as card format. There are 4 type of cards.
"Request PDPA" is to ensure data privacy compliance. PDPA stands for Personal Data Protection Act. It's a law that protects individuals' personal data from unauthorized access and misuse.- Draft Candidate Card - This profile is yet to be saved as few of the details are pending and will not be available during any job search. One can either "Edit" and save this card or "Delete" the same.
- PDPA Consent Pending - The request to get consent of candidate to use/share his profile with potential employers is yet not sent to candidate to use personal data. "Red Icon" on top right hand side demarks such candidate cards.
- PDPA Consent Given - This indicated that candidate has given consent to use/share personal data with potential employers. "Green Icon" on top right hand side demarks such candidate cards.
- PDPA Consent Request Sent, Consent Pending - This indicated that candidate is yet to revert on request for consent to use/share personal data with potential employers. "Yellow Icon" on top right hand side demarks such candidate cards.
-
1 Click on "View Profile" to see candidate profile in details. Refer below for more details.
-
2 "Update Owner" changes the ownership of profile, if required.
-
3 "Assign Job" is used to assign candidate to a particular job as applicant.
-
4 "Upload Resume" if not done, or a revised version is shared by candidate.
-
5 "Request Resume" sends request to candidate for latest resume.
-
6 "Share" shares candidate's profile with concerned stakeholder.

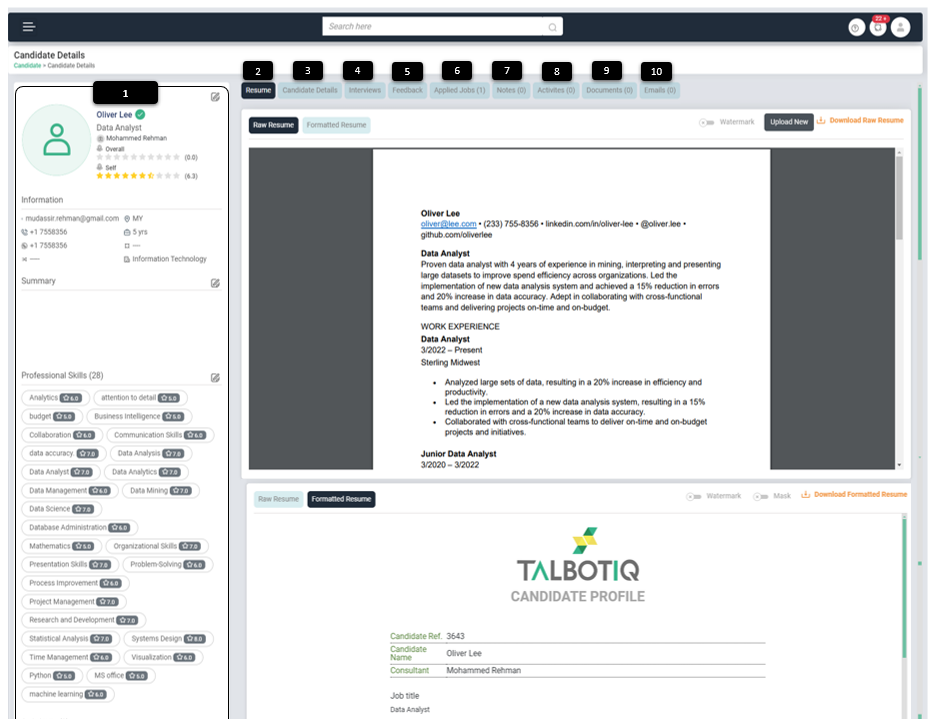
Candidate Profile Details after clicking on Candidate Card ellipsis as mentioned above, click on "View Profile". This page opens with complete candidate profile & relevant details
-
1 After clicking on ellipsis, click on "View Profile", this will open candidate profile details
-
2 "Resume" click to view resume with various options:
- Raw Resume: This will show original resume uploaded in the system as it is.
- Formatted Resume - This feature formats raw resume as in a standard format with brand logo or organisation.
- Watermark - This option adds watermark as per requirement. Click this option "on" and then download resume.
- Mask - To support DEI initiatives and to have fair resume screening without any bias, mask feature hides any information which is not wanted such as gender, salary details etc.
-
3 "Candidate Details" gives details about "Experiences", "Education" of candidate. This tab also reflects "Recommended Jobs" as well as "Screening Info" about the candidate.
-
4 "Interview" gives details about "Upcoming Interviews" & "Past Interviews" for the candidate with ability to filter the interviews Job wise.
-
5 "Feedback" contains and remarks/ feedbacks given pertaining to candidate in past interviews.
-
6 "Applied Jobs" reflects jobs that candidate has applied.
-
7 "Applied Notes" it can be used to add notes one wants to add regarding candidate plus noted written earlier are also available.
-
8 "Activities" which can be a call or a meeting with candidates can be assigned from this tab and earlier activities are also shown here.
-
9 "Documents" one can add the documents pertaining to candidate here, as well as look at earlier documents received or shared with candidates.
-
10 "Email" interactions with candidates all accessible and actionable from the TALXrecruit portal only, no need to open multiple applications.